The challenge was laid out to me by the crew here at power TV: put together a potent naturally aspirated Ford Windsor based engine to topple the 666 horsepower mark for the in house Project 666 Mustang. In addition, it needed to be reliable as it creeped past the 7,500 RPM mark through all the gears. Not the simplest task, but not an unreasonable goal either. I took the challenge without hesitation, because not only have I put together thousands of engine combinations for customers here at Pro Power, but I thought it would be exciting to design the right combination of cubic inches, compression, and induction to meet the needs of the project.

Numbers were crunched, and a nasty 427 cubic inch is what I ended up designing. I wanted to make sure we had a big bore (4.125”) with a fair amount of stroke (4.000”) and 427 just happens to be a really cool Ford displacement to have in between your frame rails. We needed a good amount of air flow and the right mechanical roller camshaft to make the power in the proper RPM range.

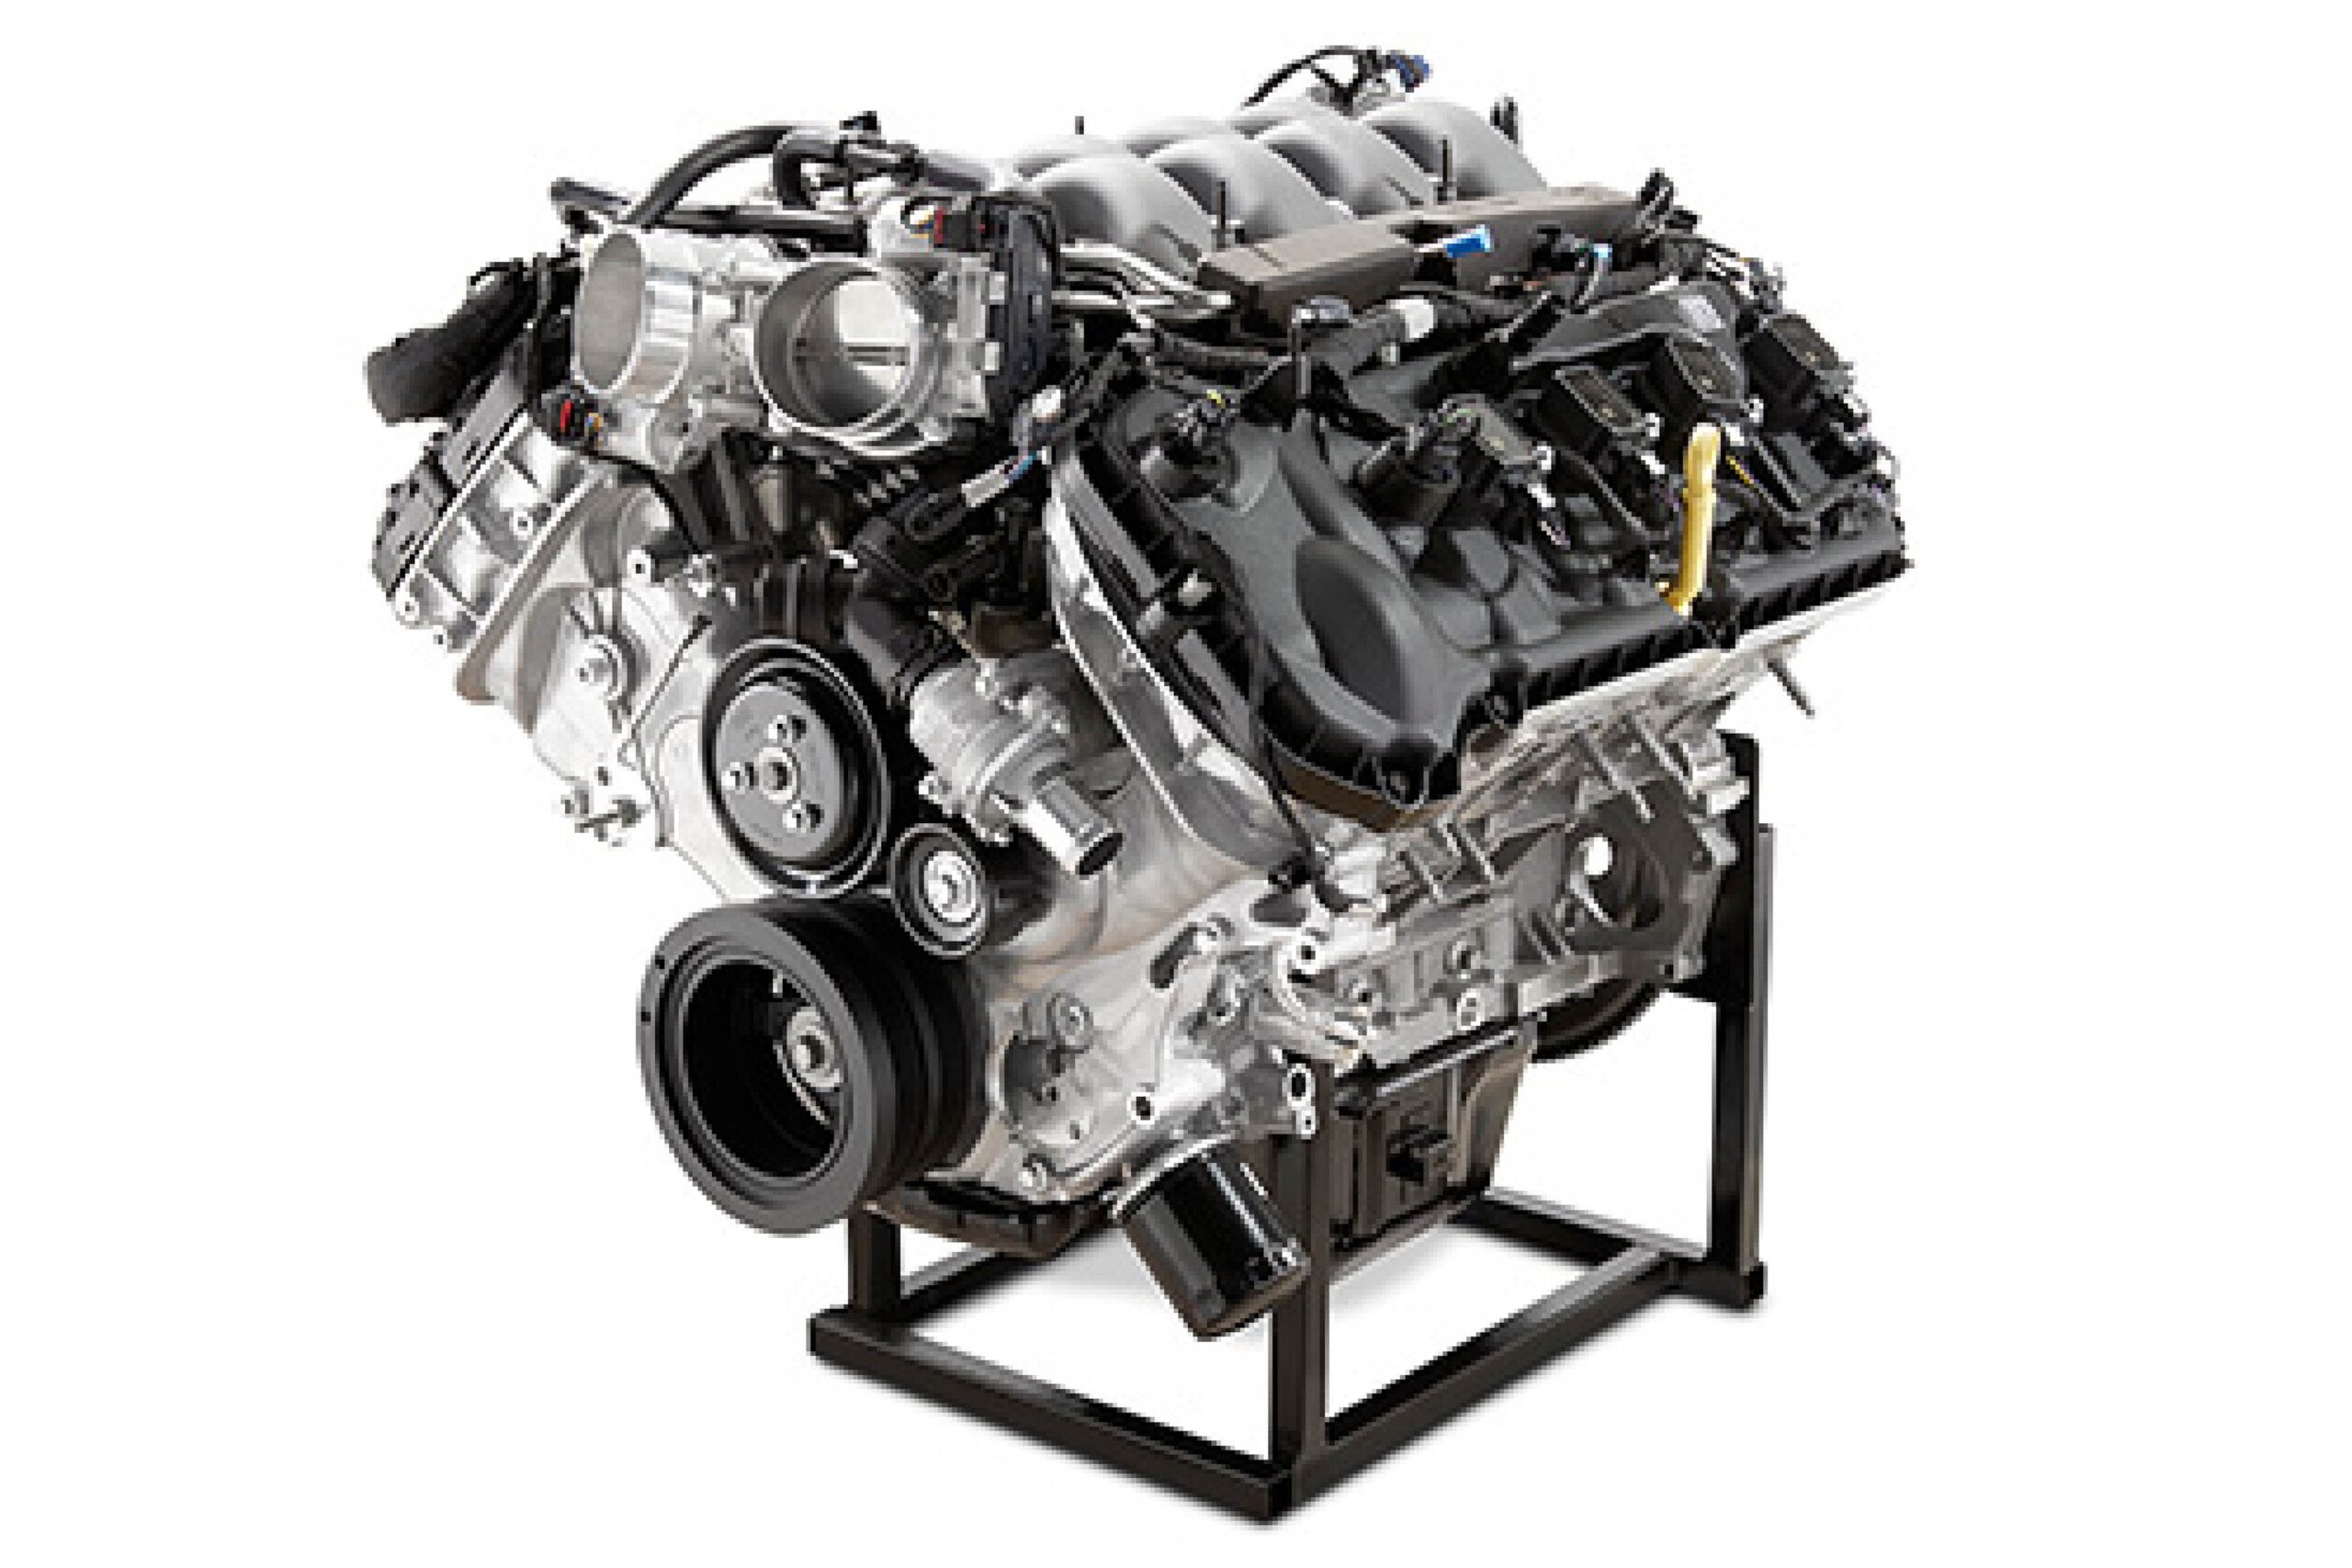
The Dart aluminum block filled with goodies from Lunati and JE sits on the engine stand ready for the top end parts to complete the long block.
This segment, as the title implies, is part two of a three part story covering the buildup of our 427 Windsor engine. In part one, we covered all of the parts and construction of the short block which included a Dart Aluminum 9.500” deck block as a base. We added the rotating assembly using a Pro Series Lunati crankshaft, Lunati Superlight 4340 connecting rods, and JE custom domed pistons and rings all riding on a set of King bearings. We also degreed in our custom Comp Cams roller camshaft, timing set, and roller thrust plate. Then we added the TCI Rattler balancer to keep it balanced with a Melling Select oil pump to keep everything lubricated. ARP fasteners held all of it together with the appropriate gaskets sealing up the crank and timing cover.
For the second part of our story, we are ready to add our top end parts: heads, lifters, rockers, pushrods, head gaskets, head studs, intake manifold, and valve covers. Here are the components that we chose:
- ARP Stainless Intake Bolts: 454-2101
- Cometic MLS Head Gaskets: C5483-040
- Comp Cams Endure-X Roller Lifters: 890C-1
- Comp Cams Roller Lifter Link Bars: 838L-1
- Comp Cams Ultra Gold Roller Rockers: 19044-16
- Dart Head Stud Kit: 66130121
- Edelbrock Super Victor EFI Intake, ported by Wilson Manifolds: 29245
- Felpro Intake Gaskets: 1262R
- Felpro Valve Cover Gaskets: 1684
- Pro Power Prime One 1pc Pushrods: 858700M
- Trick Flow High Port Race CNC Cylinder Heads: 5170T010-C01
- Trick Flow Fabricated Aluminum Valve Covers: 51400804
I chose all of the correct components to complete the long block and continued with the expert help of Ronnie Wilson from Specialties Machining for the long block assembly. Later, in part three, the engine will get expertly placed into the Project 666 Mustang which will be tuned on the dyno so we can see the results of all of our efforts.
Stud Service
With our short block complete and sitting on the stand, Ronnie quickly got to work screwing in our head studs that would secure the heads tightly against our Dart aluminum block with the high cylinder pressures that our 427 would see. This was no regular set of head studs, but a special set that had arrived directly from the shelves at Dart Machinery. I had previously found the installation instructions for our aluminum block on Dart’s website while I was hunting for the parts we would need for this project. To my delight, the website clearly stated in black and white what the exact stud specifications for this block were.

Ronnie Wilson tapped the head dowels into place then began screwing the Dart special studs into the deck of the block.
The Dart aluminum blocks use a special bottom length head stud that is ½” in diameter with a 1.780” overall length including a .300” long special bullet end. It was as simple as a phone call to the Dart techs to set us up with the correct stud kit for our aluminum block and Trick Flow High Port Race CNC heads. Their black oxidized stud kits are top notch, manufactured from the finest chrome molly steel. They are available with standard hex or twelve point nuts and have the correct dimensions on the bottom to fit the aluminum block.

It is important to use the correct stud for the block and heads being used. In this case, the Dart aluminum block required a special bullet nose for the block end of the head studs.
With the perfect studs in hand, Ronnie from Specialties Machining began screwing them into the block. They were then hand tightened into the block because a stud is designed to securely “clamp” the heads into place by utilizing force throughout the entire stud instead of stressing the threads in the block like bolts typically end up doing. Studs are really the best choice for high combustion pressures and for evenly distributing the clamping on the heads since they help keep the heads even and they reduce the chances of head gasket failure.

Cometic MLS gaskets are the latest in sealing technology. With the multiple layers of steel, Cometic can provide gaskets for Windsor Fords in varying thicknesses from .027″ to .120″ thick.
Seal of Approval
Of course, we didn’t want the head gasket to fail on a performance engine like our 427 project, so we knew it was important to use a high quality gasket. Cometic has been one of the leaders in head gasket technology with their MLS (Multi Layer Steel) head gaskets, and it is the most popular gasket we sell at Pro Power. Their head gaskets feature two embossed viton coated stainless steel layers sandwiched around another variable stainless layer inside.
The gaskets are designed to work with any type of material block or cylinder heads, and they are available in a variety of bore sizes and thicknesses. They require no retorque after initial tightening. The gaskets are a great alternative for high sealing with high cylinder pressures and don’t require any o-rings or special work to seal water and oil passages. The nice thing is that not only does Cometic have a superior part, but as a catalog item, the 4.155” bore x .040” thick gaskets were already in-stock on the Pro Power shelves.

Cometic gaskets are available in a variety of bore sizes to fit correctly on any size hole, plus they require no sealer for water or oil and they do not have to be retorqued.
Rolling On
Although it may have seemed that we were ready for the heads at this point, Ronnie pointed out how he preferred to drop the lifters in next because it was easier with the heads out of the way. Ronnie had pre-assembled the Comp Cams Endure-X lifters with the appropriate link bars and slid them down onto the solid roller custom Comp Cams camshaft with some assembly lube.

The Comp Cams Endure-X lifters feature their patented captured link bar which, as Ronnie pointed out, always go towards the valley of the engine. Ronnie likes to use a good amount of assembly lubricant when installing the lifters to ensure low wear on first start-up.
The Comp Cams Endure-X mechanical roller lifters were chosen because of their excellent features for our application. I wanted to use a lifter that would have great endurance, and these lifters had all of the proper features. First, they had EDM Oil Injection Technology which introduces a consistent full flow of oil to the needle bearings around the roller wheel. Next, they had tool steel axles and precision sorted bearings which means a long life at 7500 plus RPM. Also, the lifters were available in a tall design which keeps our push rod and flex down to a minimum as well as having a cut away body to reduce overall valve train weight. With the lifters, studs, and gaskets already on the block and waiting, Ronnie was then ready to install the cylinder heads.
Let it Breathe
For any engine, the cylinder heads are very relevant to how much power can be produced. The engine is merely an air pump, and the more air you can get in, the more power the engine can make. For our 427 incher, though, the volume of air was most important because it would be naturally aspirated. Blowers and turbos force air under pressure through any size hole deep into the cylinders. However, naturally aspirated engines require the air to be drawn into the cylinders. Intake and exhaust ports have to be very efficient and be able to hold enough volume to feed 427 cubes at 7500 RPM without choking down the power. The ports, valves, and chamber must be optimized for maximum airflow. That is one of the reasons I chose the larger 4.125” bore: to unshroud the intake valves as they opened next to the cylinder in order to allow more airflow.

The entire intake and exhaust ports are expertly CNC machined for optimum flow at Trick Flow. The exhaust ports measure out at a massive 95cc flowing 250 plus cfm of air. Note the dual bolt pattern on the exhaust face allowing use of big tube headers.
There are literally dozens of small block Ford heads out there in the aftermarket, and many of them are a great design out of the box. These out of the box heads, however, simply didn’t fit our needs. In years past, for an engine like this we would buy a pair of shelf heads, round up the appropriate parts for our roller cam, and ship them off to a head porter to tweak them out for better airflow. This typically takes a lot of time and money to ensure that the engine ends up with the proper airflow characteristics. What a relief to no longer have to do that!
With Trick Flow and their line of CNC ported cylinder heads, we no longer had to waste time and energy. For years I had used their High Port heads with great success, but now they conveniently offer that same tried and true head with full CNC porting at a great value. The heads are available in several configurations with 58cc or 70cc chambers, as well as bare or assembled for hydraulic or mechanical roller camshafts. Plus, Trick Flow keeps them stocked on the shelf ready to ship whenever they’re ordered so that an engine project of this magnitude won’t get stalled for weeks waiting on the head porter.
Plus, the heads flow great numbers:
.100-inch lift: 70 cfm intake, 58 cfm exhaust
.200-inch lift: 144 cfm intake, 113 cfm exhaust
.300-inch lift: 214 cfm intake, 161 cfm exhaust
.400-inch lift, 267 cfm intake, 208 cfm exhaust
.500-inch lift, 302 cfm intake, 233 cfm exhaust
.600-inch lift, 320 cfm intake, 245 cfm exhaust
.700-inch lift, 333 cfm intake, 255 cfm exhaust

When dry fitting the heads to the block, Ronnie found a small amount of interference between the dome on the JE pistons and the chamber. With a few minutes of “massaging”, he was able to get the heads to fit the dome perfectly.
I had previously picked out the correct part number heads that came with 58cc chambers, bronze valve guides, interlocking ductile iron seats, and huge 225cc intake runners. These heads are completely assembled with 2.080” and 1.600” stainless steel valves and 1.560” roller springs with 240lbs of seat pressure and 600lbs open pressure which is perfect for the custom Comp Cam sitting in the block.
The heads are also put together with titanium 10 degree retainers, machined locks, viton seals, spring cups, ARP 7/16” large rocker studs, and 5/16” guide plates. The CNC ports and chambers intake airflow measures up at 335cfm at .700” lift, and the 95cc exhaust ports flow 257cfm which means that the Trick Flow heads are capable of supporting exceptional amounts of horsepower. Better yet, these flow numbers were achieved with a tiny 4.030” bore. Typically, going up to the larger 4.125” bore found on our Dart block increases airflow by approximately ten percent! The best part is that they come ready to install and with the right parts for this 427 project.

The engineers at Trick Flow really did a great job of offering a head with the correct parts for racing engines. The 1.560″ dual springs are setup at 240lbs. at the seat and 600 lbs. open, and they come complete with ten degree titanium retainers.
With heads in hand, Ronnie gently slid them into place over the studs first on the passenger side, then on the driver side. He had previously checked fitment in his dry assembly of the block and made sure that the valves had plenty of room to open in the notches of our JE pistons. Torquing them tightly to the block was the next step, which he did using Dart’s 12 point nuts and hardened washers. Next up were the rocker arms and pushrods.

Now with the chambers clearing the domes and the lifters in, Ronnie carefully put the Trick Flow heads into place on the block.
Pushing It
We couldn’t do anything regarding push rods until we actually got the engine to this point in order to measure for the exact push rod length needed. There are many variables that dictate push rod length: camshaft base circle, lifter height, block height, cylinder head, valve length, rocker arm, etc. All of these different components can change which length push rod is needed for each particular engine. After some quick measurements with our rockers and an adjustable push rod, Ronnie came up with the length we needed of 8.700”.

Ronnie purposely left the guide plates and studs off of the heads until they were on the block. That way he was able to align them perfectly before torquing the rocker studs into the heads with thread sealer.
The Project 666 Windsor engine was going to see 7500 RPM and had about 600 pounds of open spring pressure. That meant that we could use a good quality 5/16” push rod. If higher spring pressures and RPM were in the future, an upgrade to 3/8” diameter rods would be necessary. Luckily, we stock the Prime One chrome molly push rods in every .050” in length from about six inches to over nine inches. We whipped out sixteen of them from the shelf bin, and Ronnie slid them into the Comp Cams lifters.
Not Grandpa’s Rocker
Our rocker choice was no problem since we were dealing with Comp Cams. They now offer a new series of rocker arms labeled “Ultra Gold” that are perfect for this Ford engine. They are a premium series of aluminum rockers that are precision CNC machined to strict tolerances that yield unrivaled quality and ratio accuracy. The Ultra Gold rockers are proven to withstand extremely aggressive spring pressure and lift and are backed by a lifetime warranty.

The Comp Cams “Ultra Gold” rocker arms aren’t just pretty, they are pretty strong too. These rocker arms are more than capable of holding up to the 600 lbs. of spring pressure on the Trick Flow heads and are mounted over beefy 7/16″ ARP rocker studs.
Ronnie placed the 1.6 ratio rockers onto our 7/16” studs and over the push rods. He then went through his valve adjustment routine. Of course, the Comp Cams Ultra Gold rockers fit with no problems since they are clearanced for up to a 1.650” valve spring diameter. Ronnie then made the intake and lash adjustments according to the cam card in an orderly fashion and in no time had the valve train in place and rotating beautifully.

An old pro like Ronnie from Specialties Machining knows how to adjust the valves quickly and accurately. Our Comp Cams custom roller required .026″ lash. After adjusting, the Comp Cams rocker nuts get locked into place with the inner set screws.
Intake the Fresh Air
Next up was our big bad intake manifold. An engine like this one needed to breathe, and nobody directs the fuel and air mixture into the ports like Edelbrock. Their Super Victor intake manifold for the 9.500” deck was ideal for the induction needs of our 427 project. We are planning on eventually adding a carburetor to the top of this engine, but just in case fuel injection is in the future, Edelbrock offers an EFI version of this intake that is pre-machined for fuel injectors and fuel rails with an elbow bolted to the carb pad.

Extensive porting work was done to this Edelbrock Super Victor manifold by the Wilson Manifolds crew to maximize airflow and mixture. Note the fine polished look inside the plenum.
Luckily, the guys back in California just happened to have an intake on hand that was not only the same Super Victor that was needed, but it also had been fully ported by the artists at Wilson Manifolds. This was indeed a great find because the ports and plenum had already been opened up to maximize airflow and just happened to be the same size as our ports on the Trick Flow CNC ported heads.
Ronnie cleaned the intake up and then lowered it between the heads. Sandwiched between the heads and intake were a pair of Felpro 1262R intake gaskets that Trick Flow recommended to match their ports. After checking for a perfect fit, Ronnie then torqued the intake down tightly with ARP stainless steel hardware.

Ronnie torqued the Edelbrock intake to the heads with Felpro 1262R gaskets and ARP stainless steel intake bolts.
Covering Up
To clear the roller rockers and also for a great racy look, we got a pair of Trick Flow fabricated aluminum valve covers. These covers are not only lightweight, but are also very tall for clearing all types of rockers and stud girdles. Also, they are mounted through tubes that are welded in from the top of the cover to the rail for rail stiffness and great gasket sealing. They are finished in natural aluminum with an embossed Trick Flow logo which makes them look awesome. Ronnie installed a pair of Felpro rubber valve cover gaskets in between the Trick Flow tall covers and tightened them down over the rockers with the supplied cover hardware.

The fabricated aluminum Trick Flow valve covers are really light weight, and the wide open tall space inside clears most valve train hardware with ease.
This completes the coverage of part two of the Project 666 long block build at Specialties Machining. After crating up the incomplete engine and shipping it out to the Power TV garage, the missing oil pan, carb, and accessories will be added to it so that it can be dropped into the Project 666 Mustang. Part three of this story will really get exciting when the nasty 427 is placed on the chassis dyno to see if the combination we chose will achieve those elusive 666 plus horsepower numbers we are aiming for!

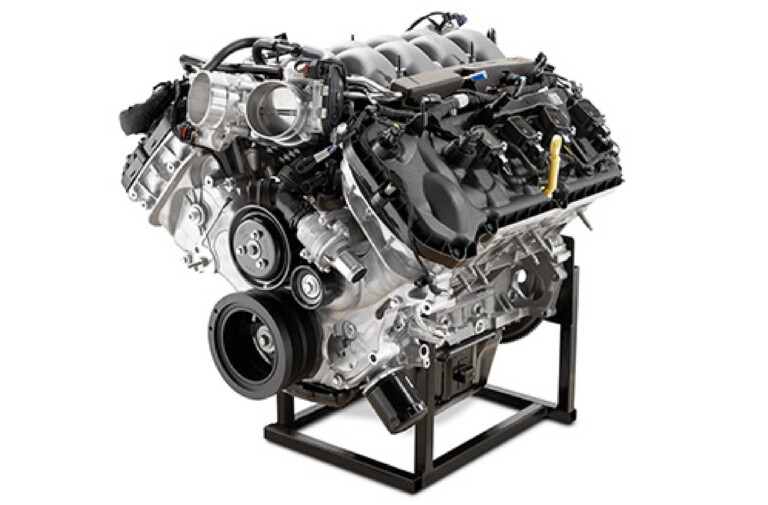
The Nasty 427 long block is together and looking fast on the stand. A few minor parts will complete the engine so it can be flogged on the dyno in the Project 666 Mustang.