When we begin to tear apart our vehicle of choice and drive headfirst into a modified build project, the first thing on our to-do lists are typically the more obvious performance-enhancing items. This could range from engine components or an entire new engine, transmission, brakes, and tires. One of the more commonly unappreciated and least understood areas of a vehicle is the rear suspension. The factory suspension under your vehicle is all fine and great if you’re just taking little Timmy to his tee-ball game, but when you’re ready to rip around a tight chicane or rotate the starting line at the dragstrip, it just doesn’t cut the mustard anymore. Thankfully, companies like Detroit Speed offer aftermarket, replacement rear suspension systems for multiple different makes of vehicles to give your ride the edge it needs in getting the power to the ground effectively.
When we went looking for the perfect suspension upgrade for our Project MaxStreet 1966 Chevy II that offered the versatility and performance to go along with the big power coming from our 555 cubic inch Edelbrock/Musi crate engine, we turned to none other than Detroit Speed and their new QUADRALink four-link suspension system.
It can be easy to make the whole theory of vehicle suspension and suspension geometry difficult, especially if an engineer is trying to explain it, but it’s really a rather simple concept. Tuning it is more of a learning curve, but understanding how it all works isn’t anything that a few minutes and a cup of coffee can’t accomplish.
When you get right down to it, the primary function of suspension is to provide a smooth ride for you and your vehicle. The force of motion when encountering a bump in the road will cause your wheels to move up and down horizontally in concert with the road surface. Without anything to absorb the energy between the wheels and the car itself, the vehicle would – at speed – lose contact with the road and eventually wear the car (and your teeth) to pieces. Think of an empty wheelbarrow when rolled over an uneven surface – it bounces uncontrollably. Not comfortable, and certainly not safe.
Understanding a Leaf Spring Suspension
Our Project MaxStreet 1966 Chevy II comes from a time when leaf springs were pretty well the standard for rear suspension, even on performance-minded automobiles. Leaf springs were commonplace and found on most American vehicles until the mid 1980’s, and can still be found underneath many trucks and heavy-duty vehicles today. When applied in applications that are designed for their use, leaf springs are quite effective. But when you overstep those boundaries – such as attempting to put close to four figures worth of horsepower to the ground through them as we are – their ineffectiveness becomes glaringly obvious.
Leaf springs, which are commonly referred to as semi-elliptical springs, are springs that are formed in a slender arc-shaped length of steel (or other metals) of rectangular cross section. The springs are mounted to the body of the vehicle at each end, while the center section of the arc is attached to the axle housings through the use of a clamp. The leaves can be attached to the vehicles frame either directly at both ends or just at one end while the other is mounted with a shackle, or short swinging arm. When used on larger and heavier vehicles, several progressively shorter leaves of springs can be stacked atop one another in layers for additional strength to cope with the increased weight.
Leaf springs actually date back to mediaeval times on horse drawn carriages and were originally known simply as “carriage springs.” Despite their ancient roots, however, they still offer some advantages over modern coil-type springs. On heavier vehicles, they spread the load of the weight more widely over the vehicles chassis, while helical (coil) springs transfer it to a single point. In addition, they also locate the axles. In other words, they inhibit the side-to-side movement of the rear end housing, eliminating the need for trailing arms and panhard bars that are found in modern suspension designs. This both cuts down on cost and weight in a simple live axle rear suspension.
But as you increase the horsepower being applied to the rear suspension, you also increase the forces of acceleration, and this can greatly change the dynamics of a leaf spring setup. During hard acceleration, such as drag racing use, the leaves will want to twist and subsequently, will lead to wheel hop until settling back down into their proper orientation. If rounding a corner at a fairly high rate of speed, the leaf spring method will tend to lose control of the lateral location of the rear end and axles, and that’s a bad thing for a myriad of obvious reasons.
The Benefits of a Modern Four-Link Suspension
Suspension is every bit as important as the monster you’ve got lurking under the hood, and with our ProCharged 555ci crate engine making in excess of 800 horsepower to the rear wheels, even a simple modified leaf spring setup just wasn’t going to be enough. It was all fine and great in our Chevy II as it came from the factory, but this ain’t your daddy’s Chevy II anymore. What we needed was something that could handle the rigors of some big horsepower in various uses – from the street, to the strip, and even the road course – while offering some level of flexibility and tunability. And that, my friends, was a four-link.
Four-link suspensions are virtually unmatched in high horsepower drag racing applications where consistent traction and nearly limitless tuning ability are a must. As well, they are very popular on road course vehicles and have become increasingly present in the Pro Touring style of project cars that are all the rage these days.
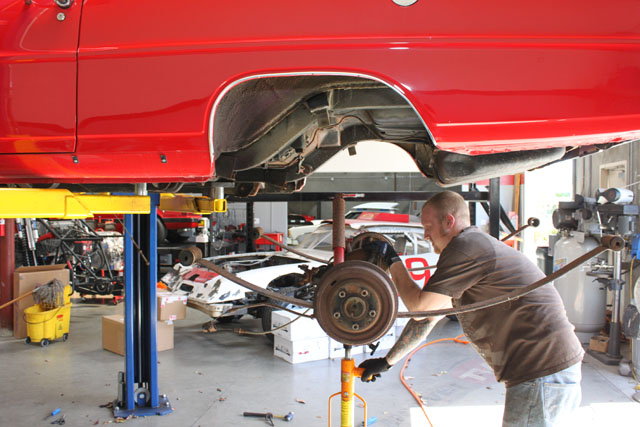
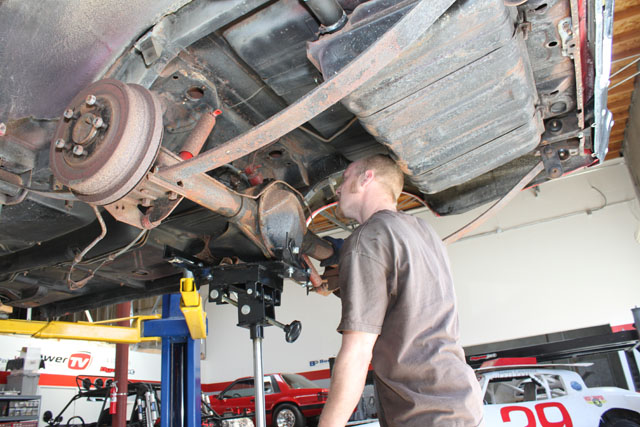
Sean works on removing the old factory leaf springs and rear end housing to make way for the new Detroit Speed QUADRALink and 9" Moser housing
The popularity of the 4-link primarily centers around its ability for a vehicle to accelerate rather quickly or turn freely through a corner without a loss of forward bite. While the leaf springs would wheel hop or lose hold of the axles, the 4-link will stand its ground. There are two different types of four-links: parallel and triangulated. They both accomplish the same purpose as one another and any other form of rear suspension – hold the rear axles in the vehicle.
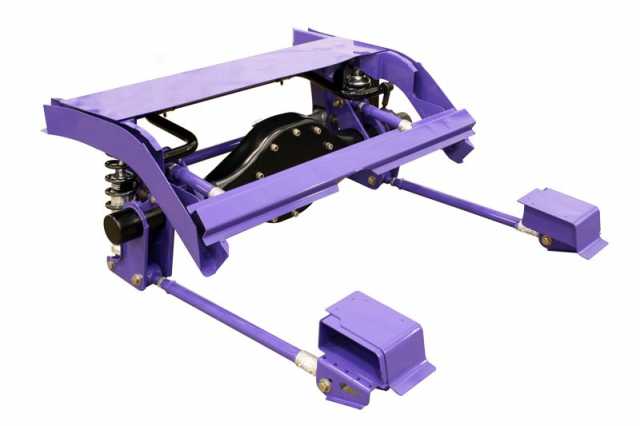
In a four-link suspension setup, there are four bars that hold the axle in place while providing vertical movement of the rear end for suspension. The bottom two bars hold the axle in place front to back, while the top two keep the housing from rotating and the pinion angle at a constant. In a triangulated configuration, the top two bars are mounted at angle from the housing to the frame, holding the housing in place and eliminating the need for a panhard bar. One of the primary arguments in favor of a four-link is the separation of duties of locating the axle and supporting the vehicle, whereas leaf springs perform both functions. As such, the four-link, either triangulated or through the use of a panhard bar, will continue to locate the axles regardless of how soft you choose to make the springs. Leaf springs on the other hand, will flex laterally and twist the leaves to the breaking point when softened.
Detroit Speed and Engineering hooked us up with their brand new QUADRALink rear suspension kit made specifically for the Chevy II. Detroit Speed and Engineering is located in Mooresville, NC, right in the heart of stock car country. DSE provides complete replacement suspension kits and components that can transform your early model project car into the 21st century marvel. Led by owners Kyle and Stacy Tucker, Detroit Speed, through its ever-growing line of extensively engineered and high quality parts and acclaimed projects from its fabrication facility, has become one the most renowned names in the high performance automotive aftermarket.
“A four-link offers a better transfer of power to the wheels, and also eliminates power hop. Without being too technical, it better defines your suspension geometry parameters that give you the ride, handling, and performance that make it feel like a late model performance car,” said Detroit Speed Vice President Stacy Tucker. “What makes a four-link work is the instant centers and percentage of wheel base as well as the weight of the car. All that is done in the side view of the four-link geometry. Basically the four-link works depending on the pickup points on the rear axle and where they converge at on the side view and how that correlates with the wheelbase of the car,” said Detroit Speed owner Kyle Tucker.
Under acceleration, the natural course of events regardless of the suspension in place, is the rear end housing and axles will want to rotate upward from the forces placed upon it from the driveshaft. With a four-link, in doing so, the two top bars will undergo a pulling force, while the two lower arms are pushed upon.
Said Stacy, “With our four-link in particular that uses our patented Swivel-Link. So you get the best of both worlds, with superior ride quality because the Swivel-Link doesn’t bind at all. So as you go through the ride motion, there is no binding. In addition, you get the excellent handling of a four-link. Our four-link uses a panhard bar, which provides better lateral locating of the rear axle. Anything that moves unintentionally when you’re on a race track or trying to get best handling is a detriment to your overall handling performance.”
The main drawbacks to a four-link swap are cost and the generally inherent difficulty of installation. However, kits from companies like Detroit Speed are both affordable and designed for relatively simple installation make much more of a case for ditching those rusty old leaf springs and never looking back.
The Detroit Speed QUADRALink Kit for Chevy Novas – PN # 041707
The Detroit Speed QUADRAKLink kit makes for a perfect upgrade of your rear suspension from the stock leaf springs. The kit utilizes DSE’s exclusive new 4-link geometry design to achieve the best possible handling.
• Patented Swivel-Link allows the suspension to fully articulate with smooth and sold motion and without binding that that can commonly occur in 4-link setups
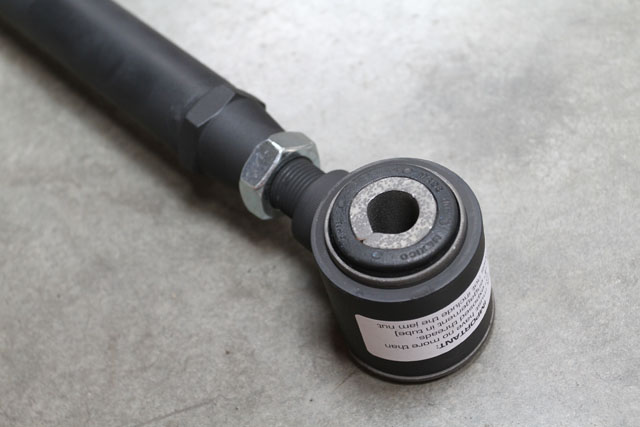
• Tuned, high-durometer rubber bushings in place of the standard heim joints and urethane bushings that are notoriously weak and noisy
• Long upper links provide a great pinion angle and u-joint angle control
• Panhard bar provides precise and effective lateral location of the axle during hard cornering and acceleration. It is also fully adjustable with changes in ride height
• Adjustable sway bar includes end links, bushings, and mounting brackets for installation.
Detroit Speed already had QUADRALink 4-link kits on the market for the 1967-1969 Camaro and Firebird, 1970-1981 Camaro and Firebird, and the 1968-1974 Nova/Venture/Omega. The kit for the 1962-1967 Chevy II is the newest addition to their product line, and what better way to put it to the test than under Project MaxStreet.
Let’s get to work!
Installation of our QUADRALink Four-Link
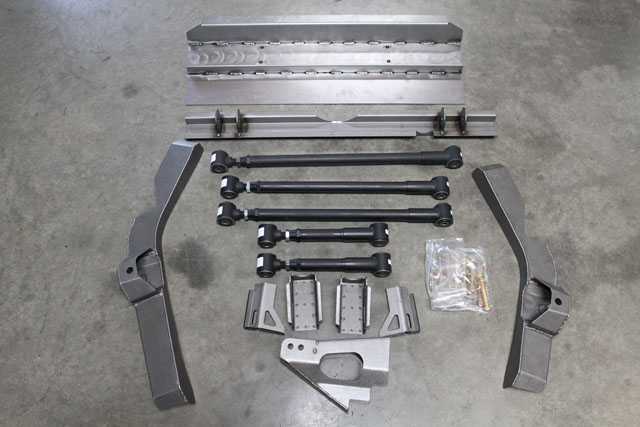
Detroit Speed provides everything you need with the kit to get your new QUADRALink installed and ready to hit the road. All the mounting brackets and cross member come fully fabricated and ready to be installed on the car. Included are the instructions, an instructional video, and printed templates for lining up and making your cuts and welds to make the installation process much simpler then one may think for such an extensive setup.
The installation process on our MaxStreet Chevy II closely followed the order of events in the supplied video, which is pretty self-explanatory once you know which parts are which and where they go. In the kit is both the upper and lower four-link bars and the panhard bar, the crossmember with brackets for mounting the upper bars and support gussets, two spacer boxes and brackets for the lower four-link bars, the mounting plate/brackets for the shocks, the panhard bracket, and the four brackets to be welded to your housing to connect it all together.
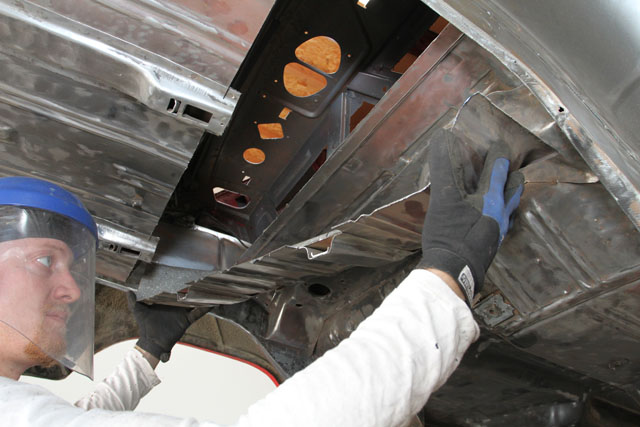
Sean removes a section of the trunk floor to make way for the new piece that provides extra clearance for the four-link
Before moving forward with the installation of the QUADRALink, we first had to prepare the car for the job. Namely, removing the seats and carpeting from both the cabin and the trunk and of course, all of the leaf spring suspension parts. We had already outfitted the car with Detroit Speed’s Deep Mini Tub kit to fit the 17×11” Billet Specialties Street Lite wheels, which required a narrowing of the Chevy II’s framerails. It should be noted that the mini tub kit does not change the installation procedure of the four-link in anyway and it is actually designed to accommodate it.
The supplied brackets for mounting the housing to the four-link bars were sent to Moser Engineering to be welded to our new 9-inch housing that will go in the car, which won’t be seen in this article but will be discussed in a future update on the project. Detroit Speed recommends a -2 degree pinion angle on the housing, and Moser will be supplying their housing as such.
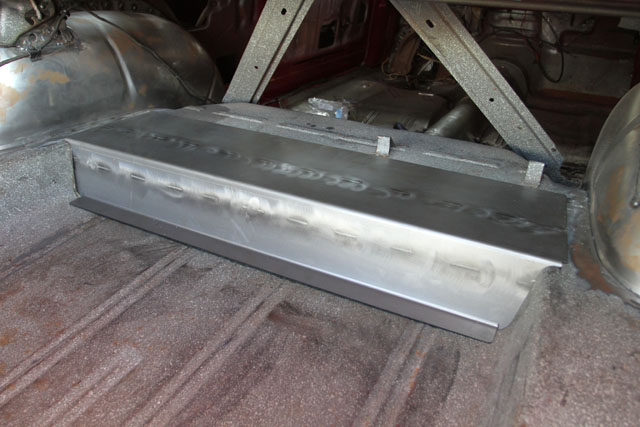
The install begins with the removal of a rectangular section of the trunk floor. Extra clearance is needed in that area for the four-link and the mounting of the panhard bracket. Supplied with the QUADRALink kit is a steel plate that raises up that section of the trunk. Once all the supplied measurements are made, it’s time to start cutting.
Next, we need to go underneath the car and remove the transport hold downs on each side, the axle jounce jumper bracket, and E-brake cable bracket. Once removed, we have an unobtrusive framerail to place and weld the DSE shock mount structure to. Using the supplied templates, the placement for cutting through the floor of the car for the upper four-link brackets is the next step. Once marked, the square area is cut and removed from each side.
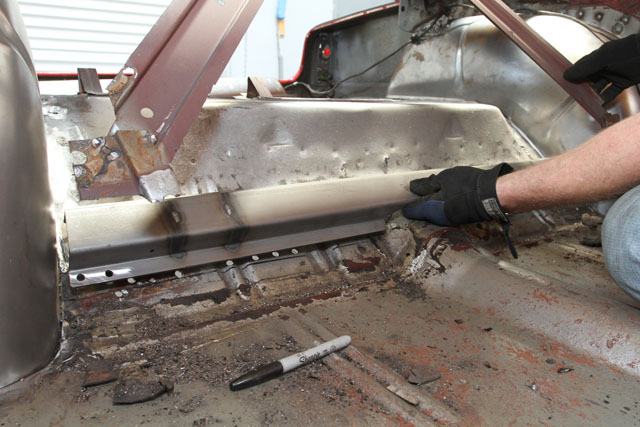
The crossmember is dropped into place once the openings are cut for the attached upper four-link brackets
The framerails are then marked on each side for placement of the rail support/shock bracket and tapped and drilled for welding. Likewise, holes are also tapped and drilled in the floor where the cross member will be and the floor area where the section that we cut out will be replaced. Each of the parts is also drilled along the edges for welding locations. Once everything is prepared, we can begin welding it all into its proper place in the car. The bracket for the panhard bar is placed perpendicular to the rocker panels and once measured, is welded into place.
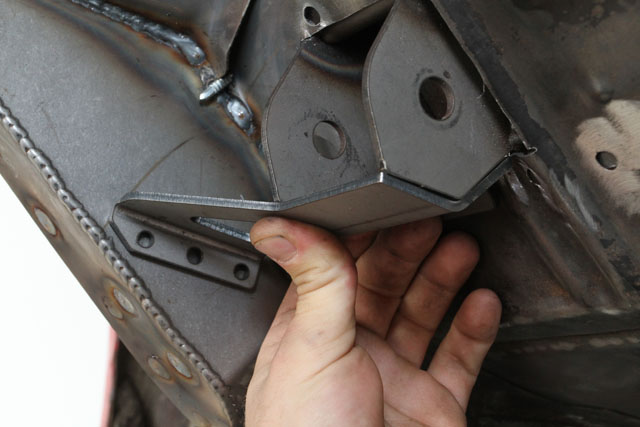
A set of steel support gussets for the upper four-link brackets and crossmember are set in place before Sean puts the welder to them
The crossmember is then dropped into place from the inside of the car. The mounting brackets for the upper four-link bars are part of the crossmember and, if the square holes that we drilled in the floorboard earlier are measure correctly, it should drop into the correct location. The supplied gussets will fit underneath the upper brackets and provide additional strength and support. Once in the proper position, both parts are welded into place.
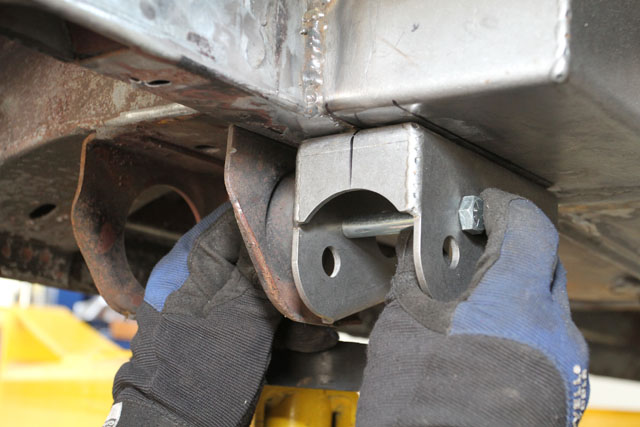
The lower four-link brackets weld to the bottom of the framerail and the supplied spacer box. Note the leaf spring bracket still intact for now to make sure we line up the mounting holes properly.
We then turn to the lower four-link brackets underneath the car. The support boxes that come in the kit not only provide additional strength for the lower four-link arms, but provide the proper positioning under the car. As you can see, we haven’t even removed our leaf spring brackets yet. With the support box welded into place, we can then position and weld the actual brackets to them.
With all of the grunt work complete, we can weld the rear seat support back together and into place, where it will attach to the new crossmember.
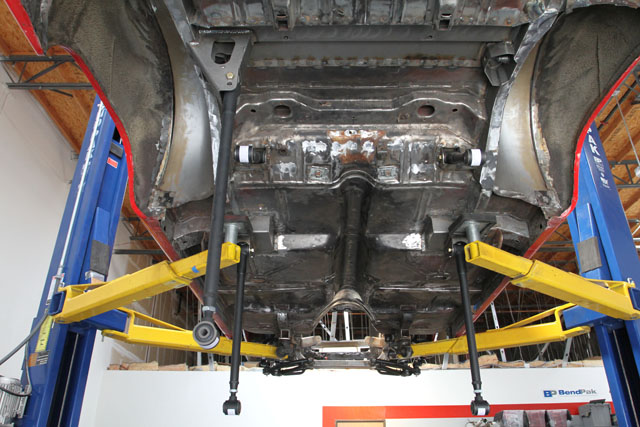
The kit all complete under our Chevy II and awaiting the arrival of our new 9" housing from Moser Engineering
At this point, everything in regards to the car itself is in place and ready to bolt up. The new 9-inch Moser housing with the four-link brackets welded into place has arrive and now we can get simply bolt it all up. One of the great attributes of a four-link suspension, as previously mentioned, is the ability to tune the suspension for a variety of environments and situations. “When you talk about changing the side view geometry, you do change those links of the upper and lower arms but also, you need to change the heights of those relative to the ground, and that’s how you can tune a four-link,” explained Kyle.
Kyle offered a list of general tuning suggestions for QUADRALink and replacement-type four-link suspensions on the dragstrip to get the most of out of your new suspension.
- Tuning of the pinion angle is probably the number one tuning tip, and is very much dependent upon the instant centers of the four-link bars in the side view geometry. Pinion angle will play a large role in bettering your 60’ time.
- Adjusting your spring rate by running a heavier spring on the right rear
- DSE will have soon offer a urethane bushing option to replace the rubber model and can play a large role in the tuning as well
- Sway bars and tire pressure
The Detroit Speed QUADRALink kit does require a moderate level of fabrication skill, though we were able to install the complete kit in around two working days. If you’re ready to ditch those old leaf springs under your classic project car, a four-link kit might be just what you need. Especially if you’re planning to make a lot of horsepower and want to plant it to the ground efficiently whether at the dragstrip, the road course, or just a cruise through the hills. Your car will appreciate it, and so will you!
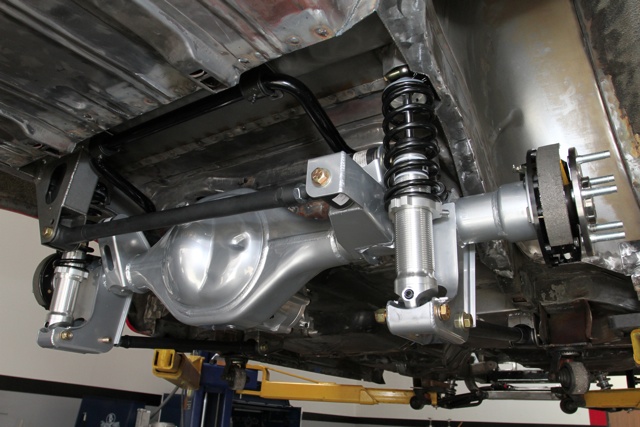
The DSE four-link kit with their adjustable rear coilover kit and new 9" housing from Moser all buttoned up and almost ready to roll


