
 Our 1966 Ford Galaxie is going through some changes lately, and it’s slowly becoming a musclecar with lots of potential. With a new engine in place, and being fueled by a dual quad EZ-EFI system, the demands for fuel pressure and delivery are far greater than the stock, low pressure mechanical pump can ever deliver.

Converting to an EFI system meant that a fuel system upgrade was mandatory.
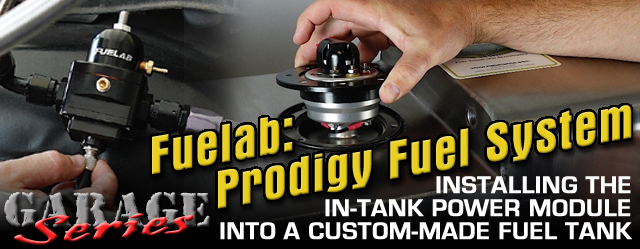
EFI systems require similar volumes of fuel that a carburetor requires, but must be delivered at much higher pressures. We opted to toss the old fuel system entirely and create a brand new fuel delivery system from the filler neck right up to the fuel rails on the throttle bodies. For this fuel system upgrade, we called on Fuelab for their new in-tank Prodigy Fuel System, and Rick’s Tanks for a new stainless steel fuel tank.
Whenever switching to an EFI system, there is a bit invested in the conversion. Prior to installation, it makes sense to remove and inspect the old tank and fuel lines, especially with the 45-plus years of dirt and particles that have accumulated in the tank. Years worth of corrosion, old fuel, and particles can wreak havoc on an EFI system, even with the proper filters in place. In some instances, it’s a good idea to replace the tank with a new one, and replacing it with a custom tank that is baffled for an in-tank pump will be an investment that you’ll be glad you made.
Motivation for the Galaxie
The motivation behind the Galaxie is the popular FE engine, which became famous sitting between the frame rails of NASCAR entries and the 427 Cobra. It ranged in displacement from 332 cubic inches up to 428 cubes when it was last available in 1976.
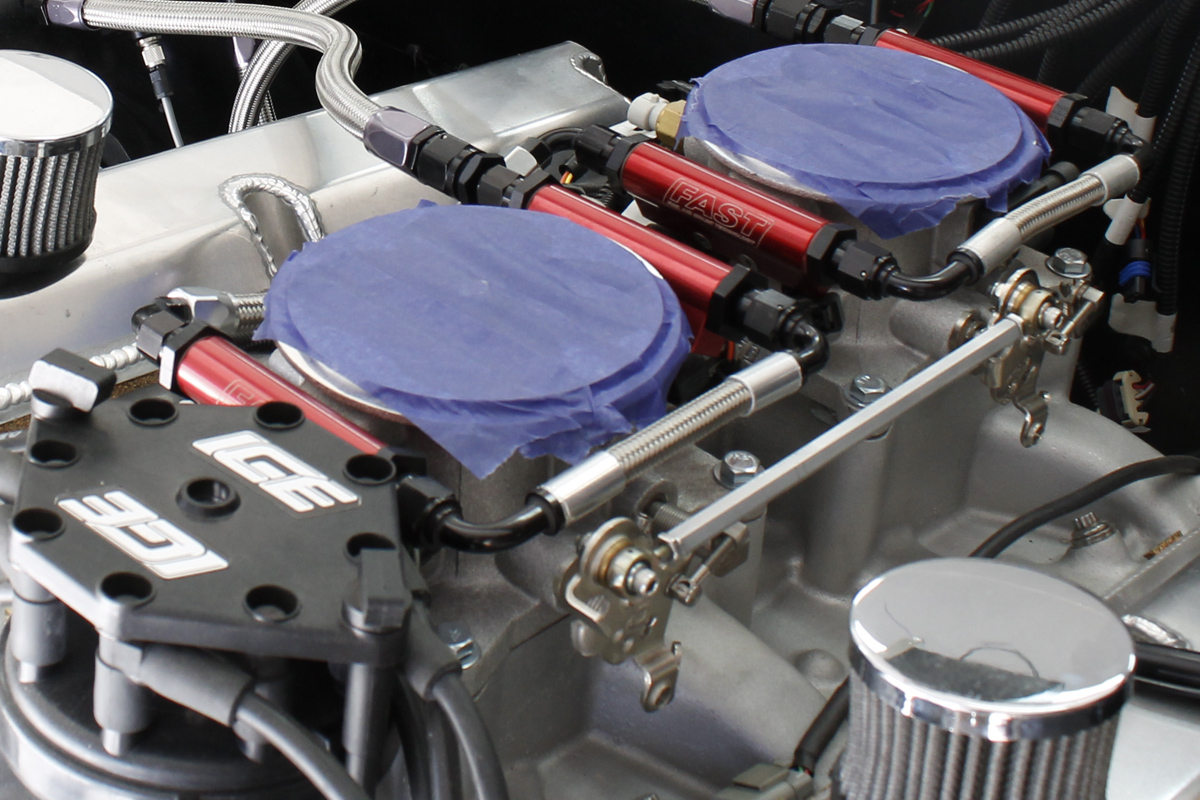
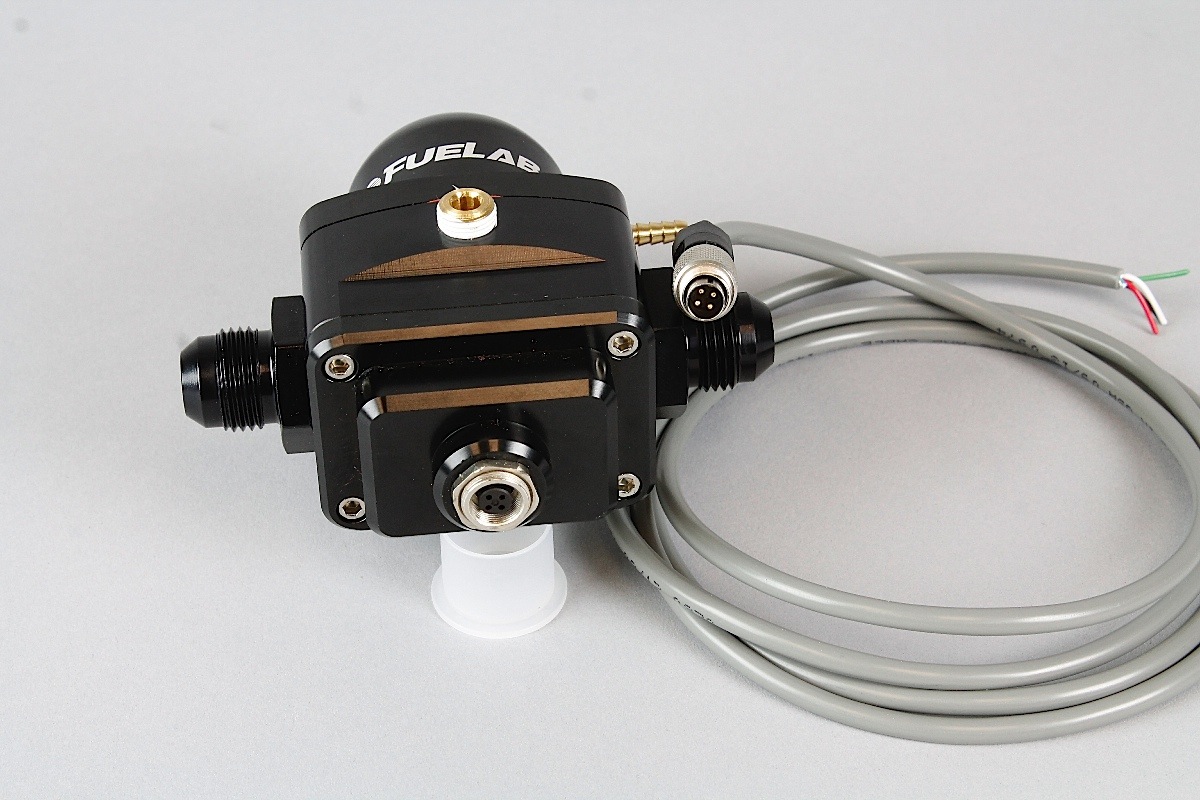
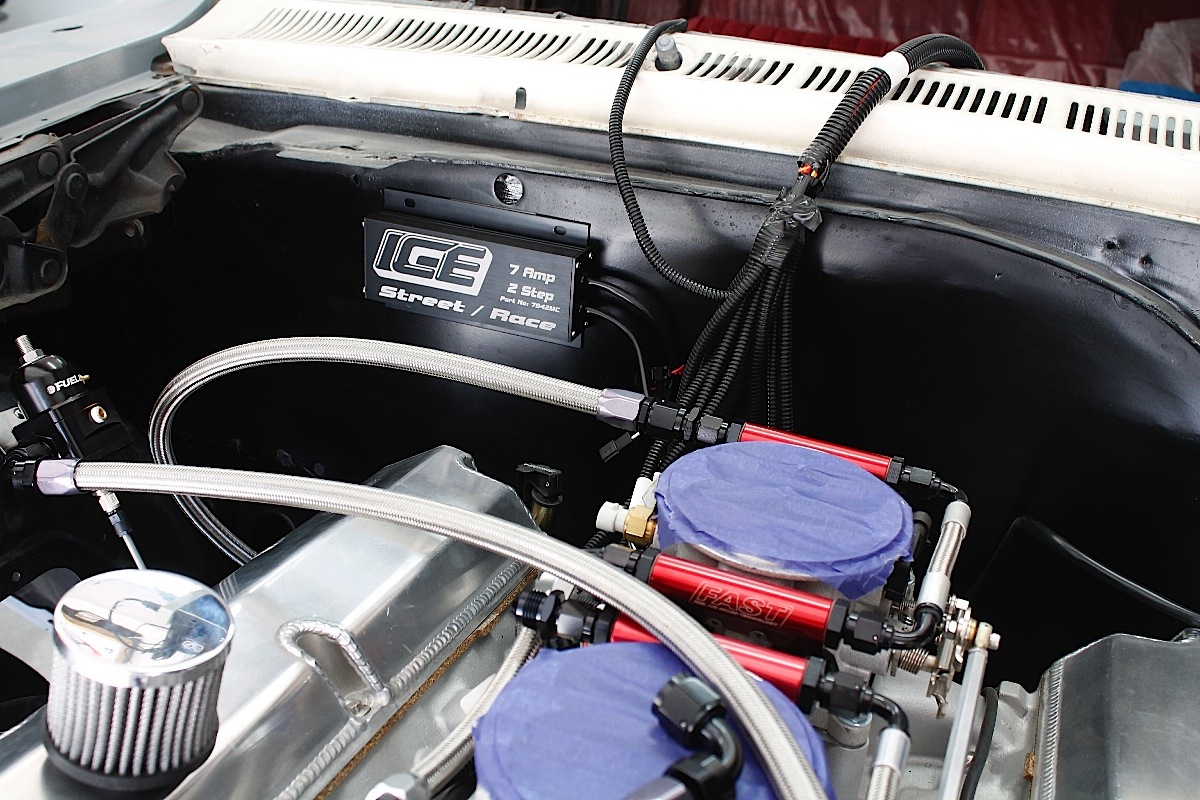
The Fuelab Prodigy system will feed the eight fuel injectors on the dual quad EFI system.
Our 1966 Galaxie was all new for that year, and the biggest of the FE Fords sat under the hood: the 428 Thunderbird V8. It served its purpose for those four-and-a-half decades, but it was time to freshen it up a bit, especially since we have big plans for this restomod.
The engine build consisted of plenty of new parts and accessories, including a front drive system from Concept 1. The fuel is delivered to the intake manifold via a FAST EZ-EFI dual quad fuel injection conversion, and the rest of the engine has been dressed up a bit, too.
Though it’s possible to reuse the factory fuel lines, we knew that the sure-fire way to make sure that no debris or particles made their way to the fuel injectors was to replace the entire fuel system with new components. We reached out to Russell Performance for all of our fittings and stainless braided fuel hose to plumb our fuel system.


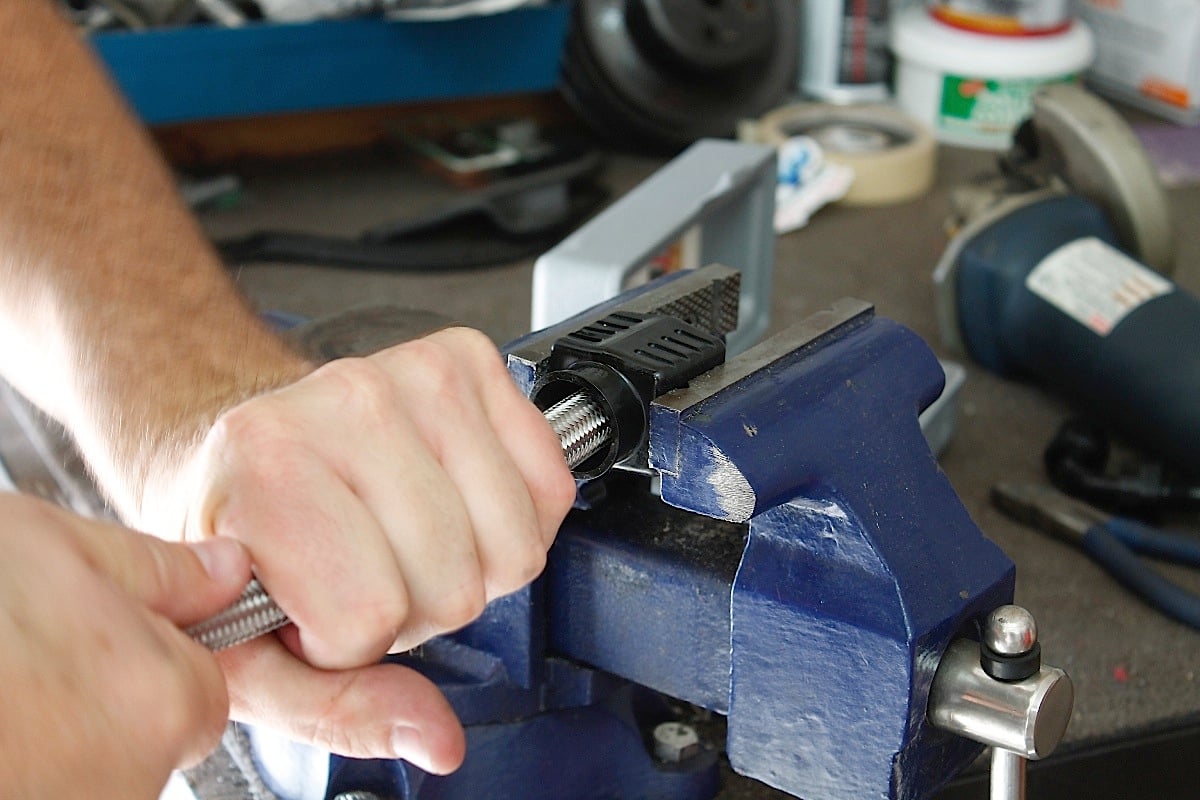
After planning out the system, we ordered the proper fittings and measured the hoses with the components installed. Koul Tools makes hose assembly a breeze.
Fueling The Needs Of A Galaxie
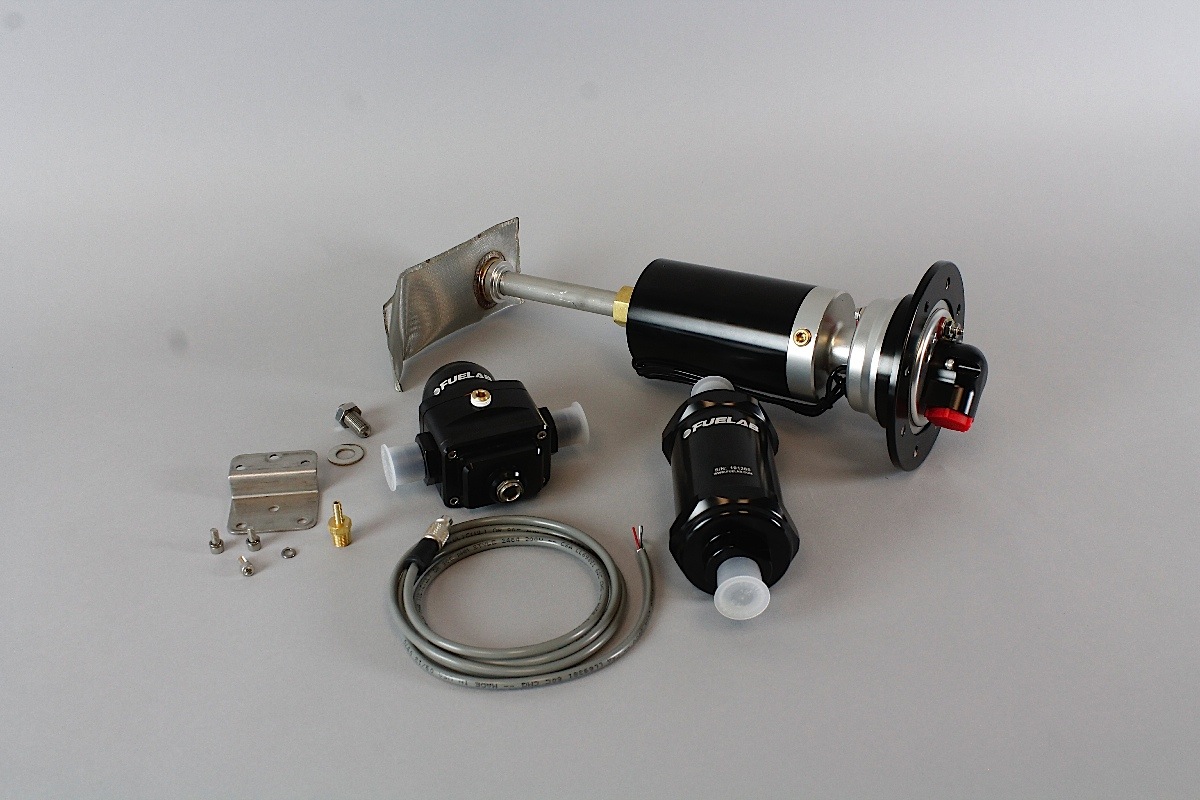
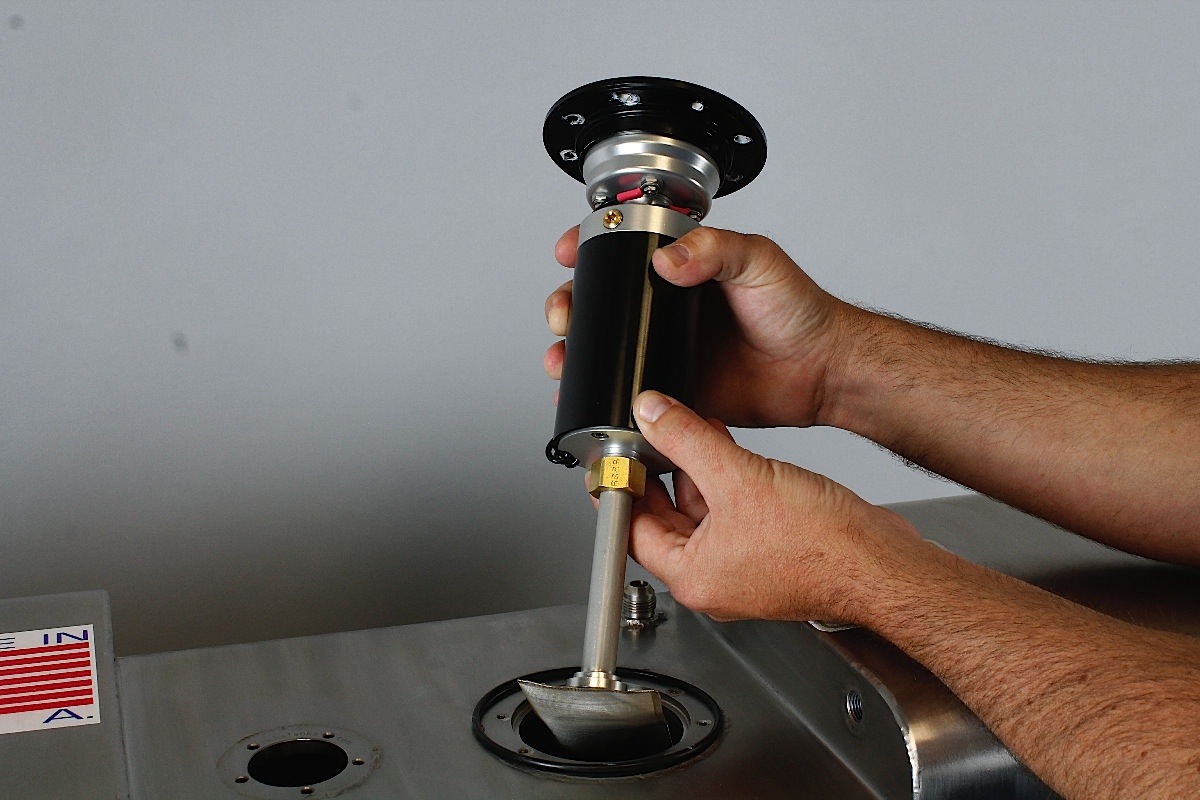
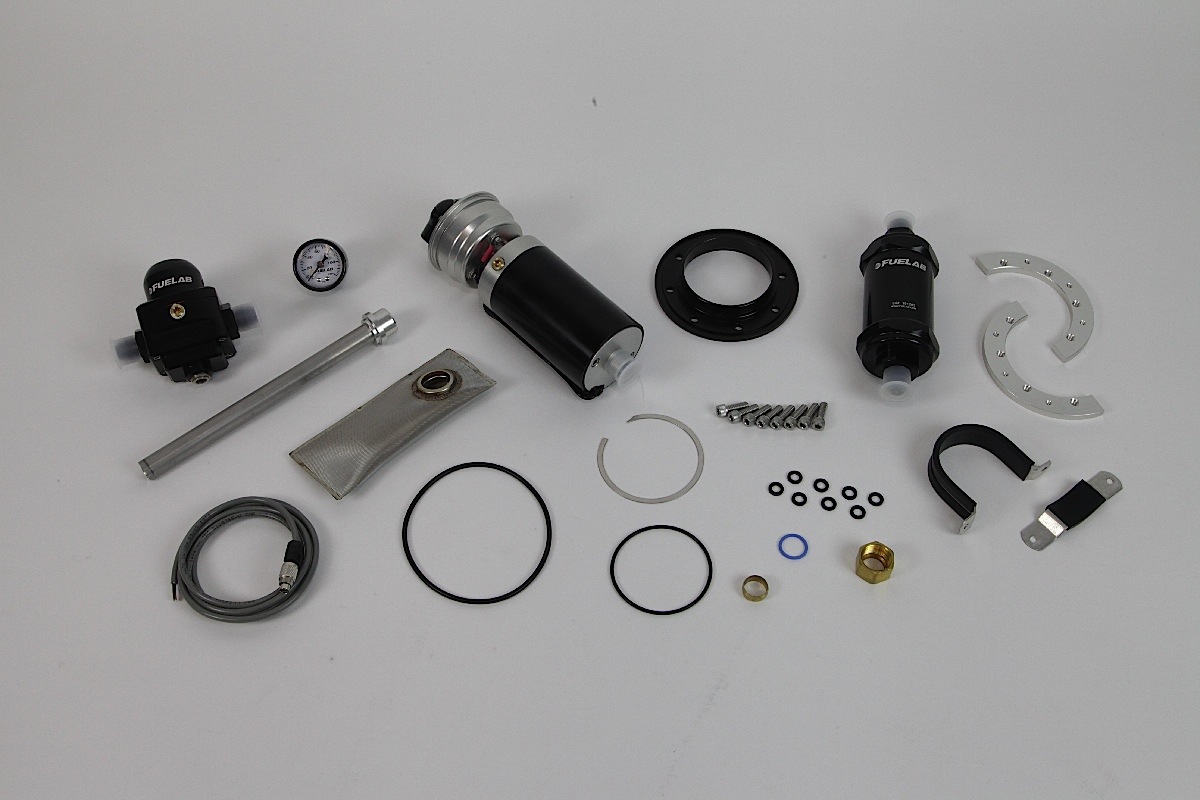
To motivate the fuel from the fuel tank to the throttle bodies, Fuelab’s new Prodigy In-Tank Power Module was our choice for this application. Since we have a custom tank, we ordered the Fabricator Installation Kit, which gives us the option to order a modular fuel pump, an installation kit, fuel filter, and a fuel pressure regulator.
The in-tank Power Module can support the fuel demands for up to 1,000 horsepower, but for lower horsepower engines the electronic fuel pressure regulator can reduce pump speed to decrease fuel flow.
There are a couple of ways to complete the fuel system, depending on vehicle and fuel system needs. Those who own a 2005-09 Mustang are able to order a kit that installs directly into the factory fuel tank, which means no cutting or fabricating on the factory tank. The Total Fuel System Packages for 2005-09 Mustangs include a fuel pump module, fuel pressure regulator, fuel hose, fuel filter, and all fittings needed to complete the installation.
Though they currently have only Mustang applications for the direct fit kits, Josh Davis, Sales and Marketing for Fuelab, said, “In addition to the Mustang, more vehicle specific applications will be available soon.” Since the Fabricator Installation Kit allowed us to select the parts we wanted, it’s perfect for those who are using a custom tank or fuel cell in a classic musclecar.
With the built-in speed control on the Prodigy pump, you don’t have to buy an expensive add-on voltage regulator or pump controller. -Josh Davis

Davis told us, “With the built-in speed control on the Prodigy pump, you don’t have to buy an expensive add-on voltage regulator or pump controller.” Where many pumps have two wire connections, there is a third connection (marked in yellow on the pump) for controlling pump speed for reduced fuel flow. Davis said, “When the third connection sees a ground signal, the pump speed is reduced. This would be useful for someone with a high horsepower engine driving on the street where high fuel flow is not necessary, or for a lower horsepower vehicle.”
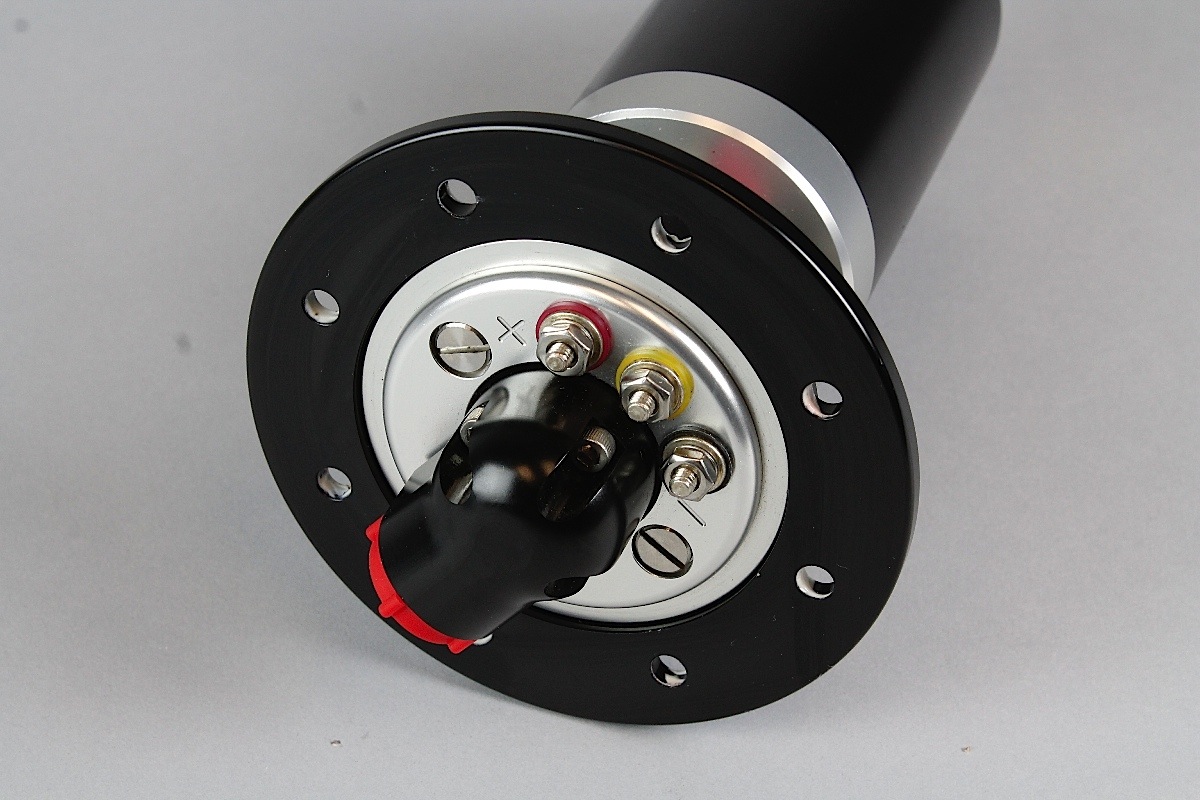
The center connection (yellow) is how the flow rate can be reduced.
The center terminal can be controlled by a switch when fuel pump speed needs to be altered between street and race applications. For those who want to install pulse-width modulation (PWM) for speed control, the Prodigy pump is fully compatible.
The PWM controller allows a person to vary the speed and output of a typical 12 volt fuel pump. By adjusting the volume of the fuel, it takes stress off of the pump without affecting the preset fuel pressure of the pump. For our application, we’re using their electronic fuel pressure regulator to control pump speed.
The pumps available in our kit include the 91901, which will support up to 1,000 horsepower, and the 92902, which will support up to 1,800 horsepower.
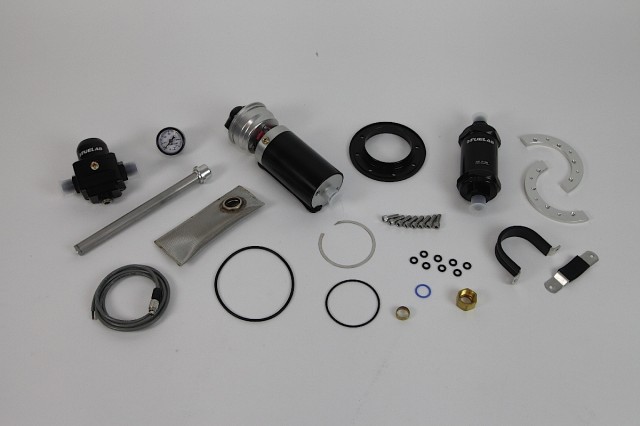
Fuelab Prodigy In-Tank Fuel System
Fabricator Installation Kit & Components
- Power module, part #91901
- In-tank pump
- 105 GPH at 45 PSI
- Supports up to 1000hp
- Reduced speed control
- Fuel pressure regulator, part #52902C
- Electronic control
- Controls flow rate based on demand
- Reduces heat build up
- Reduces vapor lock
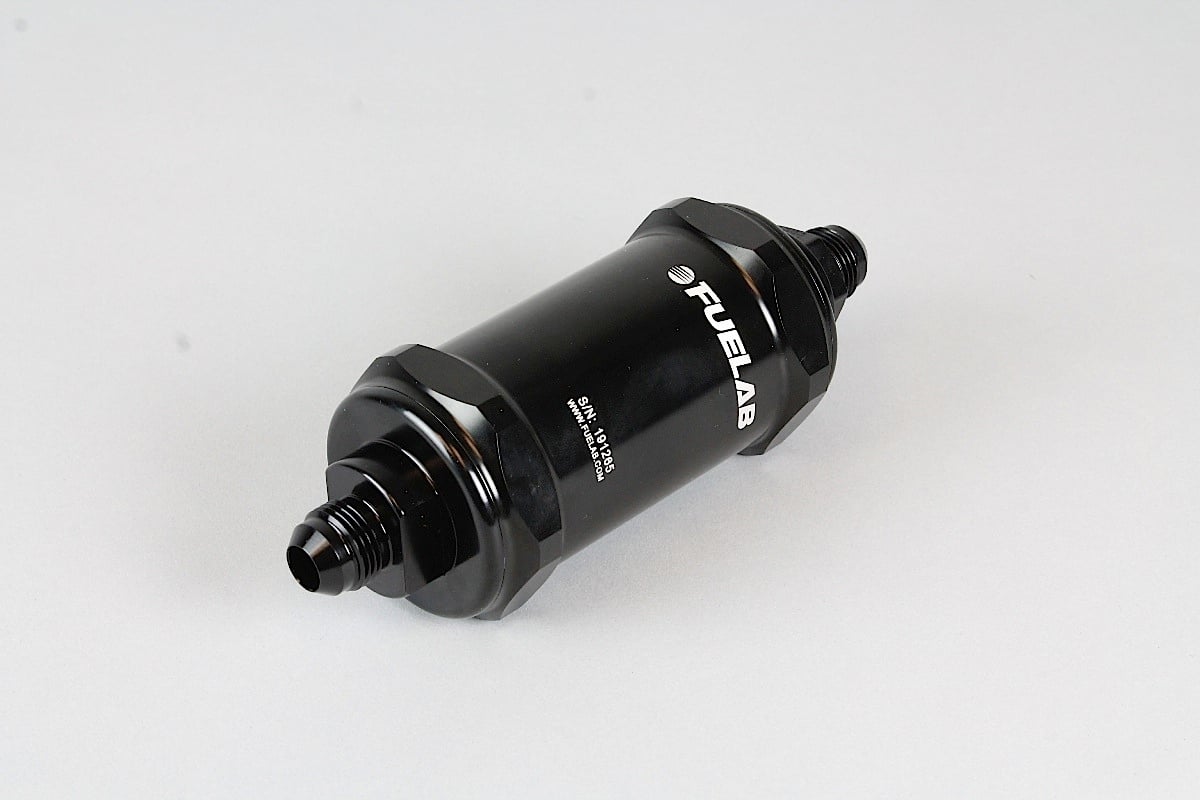
- Fuel filter, part #81802-1
- 40 micron for gasoline
- 6 micron for E85, alcohol
- Fuel pressure gauge, part #71501
The steady pressure is acquired with a high-efficiency, sling-vane positive displacement pump with lightweight, efficient DC brushless motors to reduce current draw. Because of the brushless design, there aren’t any brushes to wear out or corrode; and the wet motor design has no dynamic shaft seals that can wear out. The variable flow is controlled internally, and the 12 to 16 volt compatibility allows for street or racing applications, allowing for adjustments based on fuel demand.
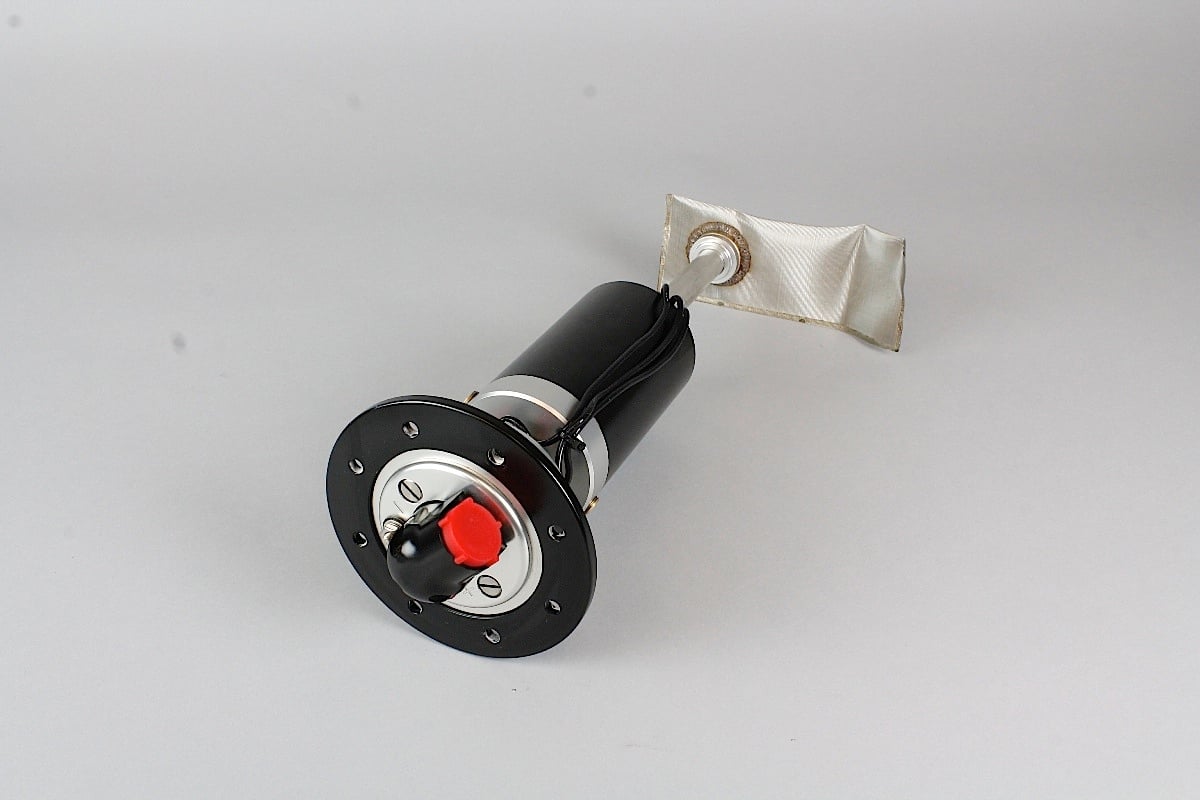
The fabricator installation kit we used for our custom tank includes all necessary components to mount the pump to the tank. It includes the filter sock, mounting flanges, pickup tube, and hardware. The system does require a bypass style regulator and a fuel return line, and allows the fabricator to adjust the hanger based on the depth of the fuel tank.
Since the kit is modular, it is a cut-to-fit design that will fit in tanks as deep as 16 inches or as shallow as 8.875 inches. The adjustable pickup tube can be cut down to size, and the pump, tube and filter sock are assembled and mounted in the top of the fuel tank. The feed line is connected to the pump hanger, and routed to the engine compartment for fuel delivery. Since we had a custom tank built, we opted to use just the basic components we needed to install the pump in the tank.
There are some complete kits available, and more will be added, but from a fabricator's standpoint, the kit needs to be customizable. Fuelab delivers.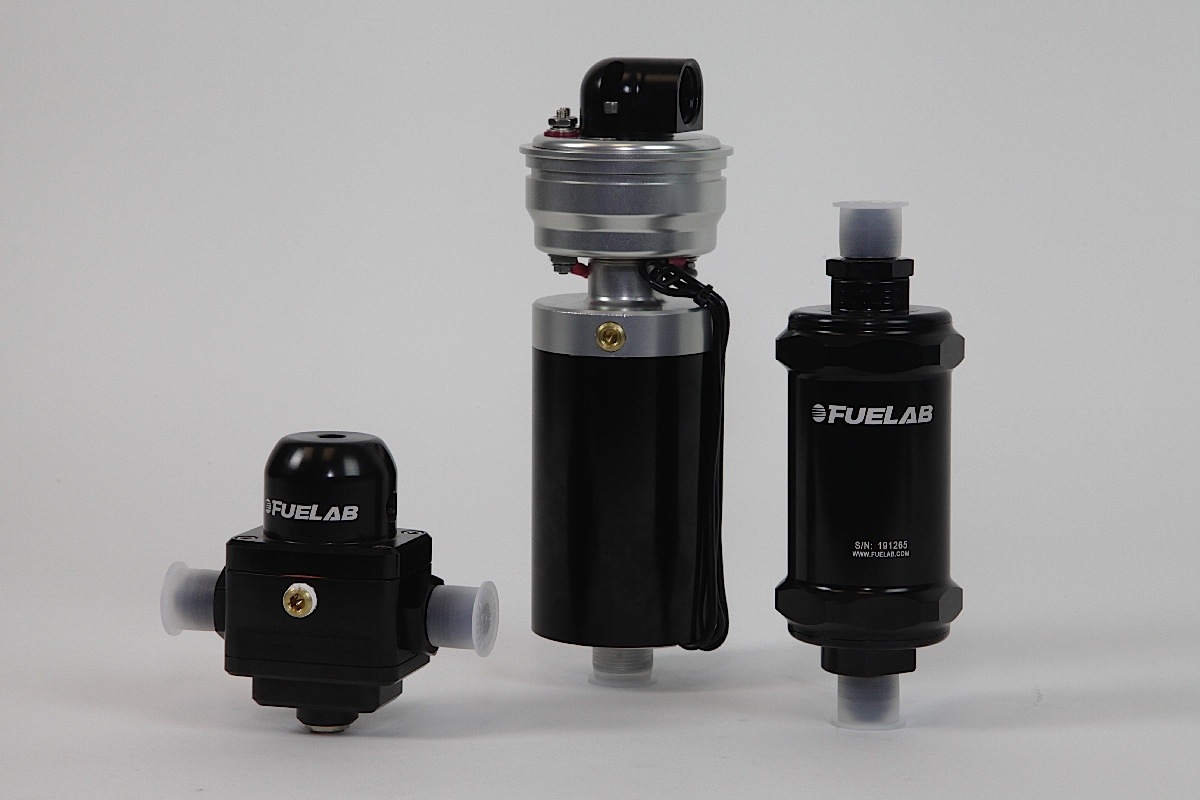
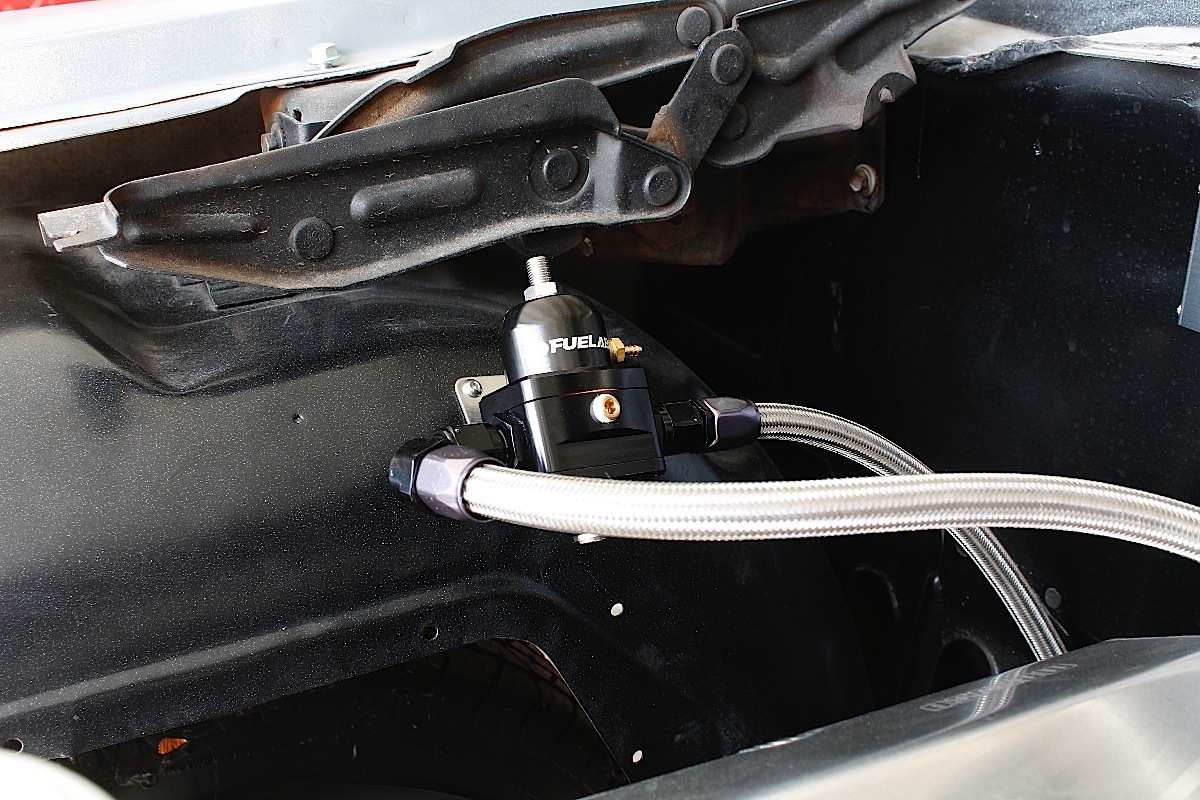
Typically, a return-style system like ours uses a bypass style fuel pressure regulator, such as Fuelab’s Electronic Fuel Pressure Regulator (FPR). These regulators are designed to work directly with the Prodigy line of fuel pumps, and help to reduce heat build up and vapor lock conditions in performance and racing applications.

A pressure gauge can be mounted to the 1/8-inch NPT port and adjusted mechanically, fuel pump speed is controlled electronically.
Setting up the Electronic FPR is done mechanically like a typical bypass regulator, then the electronic regulator’s speed control takes over based on the fuel demands. The FPR generates a signal that is sent to the Prodigy fuel pump, and this signal helps to control the return line flow rate.
A lower current draw reduces the power output of the pump, but when demand is increased the electronic regulator increases current flow. This, in turn, increases fuel flow for complete pump control without additional connections, control boxes or calibration being necessary.
The center terminal is connected to the electronic FPR harness white wire.
This also benefits a racer with high fuel demands when the car is being staged or driven back to the pits; when fuel demand is lowered, the electronic FPR sends a signal to the Prodigy pump, thus reducing pump speed and flow.
Fuelab also provided us with all the filtration we needed for this conversion. Since the EFI system is new to this engine, and we’re replacing the entire system, we made sure to get the proper filters for our needs.
The fuel pump has a 75-micron filter sock at the pump inlet. This captures larger particles prior to entering the pump. Most pumps can handle particles smaller than 75 microns, but if the sock filter blocks much smaller particles it can clog easier and starve the pump.
Smaller particles are then filtered by the inline filter with a smaller, ten-micron paper filter that will trap them so they don’t make their way to the fuel injectors. For alcohol or E85, Davis recommends the six-micron filter.
Remember: measure twice, cut once, leaving plenty of flex in the fuel hose.
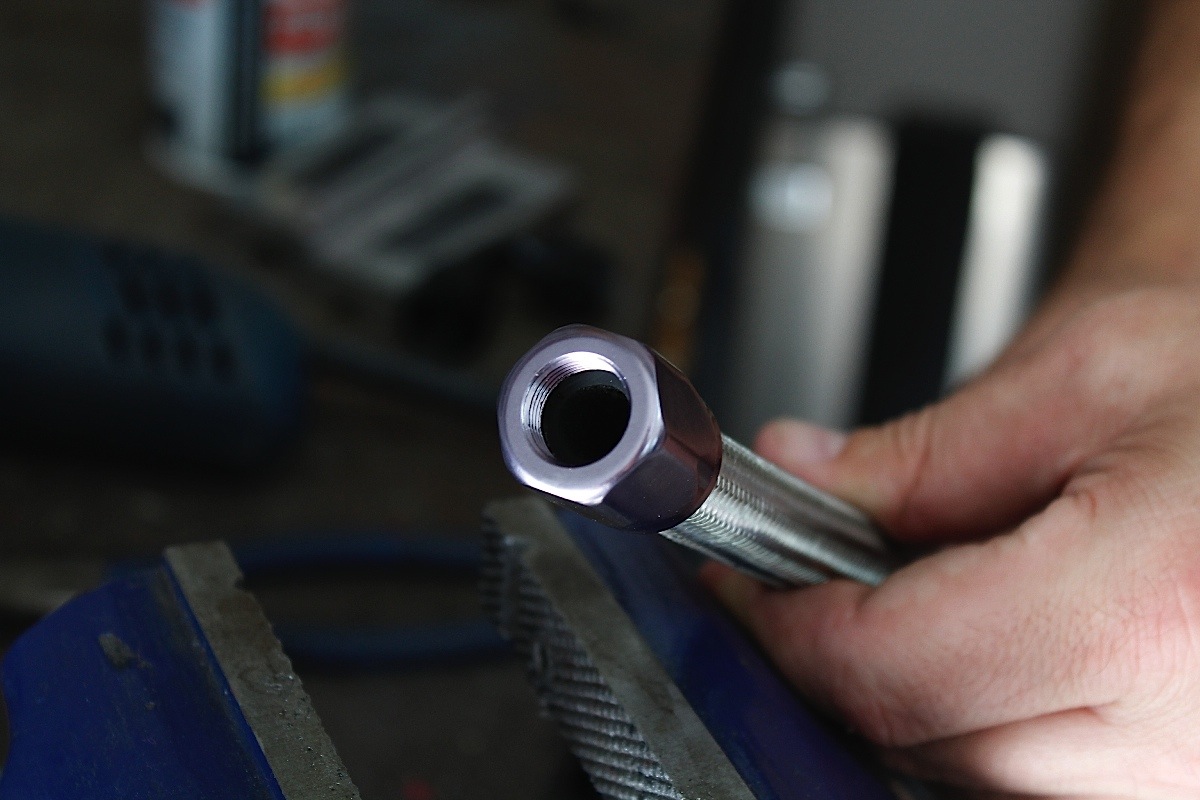
With all of the components in hand, it’s best to plan out the fuel system first: route the fuel hoses to make sure they’re away from direct heat or moving parts, and not susceptible to being pinched or worn out from vibration. Deciding which fittings to use, whether they are -8 or -6, straight, 45-, or 90- degree, and how many of each fitting is needed, will make the installation smoother and quicker.
There’s nothing worse than getting to the last phase of the installation and realizing that a 90-degree -8AN fitting is needed and the only fitting left won’t cut it. It’s also advisable to not cut fuel hoses and install fittings until you’ve decided where to mount components like the in-line fuel filter and the pressure regulator.
We test-fit each hose prior to cutting them and attaching the a fitting on the opposite end. Soft jaws will help keep the anodized finish looking great.
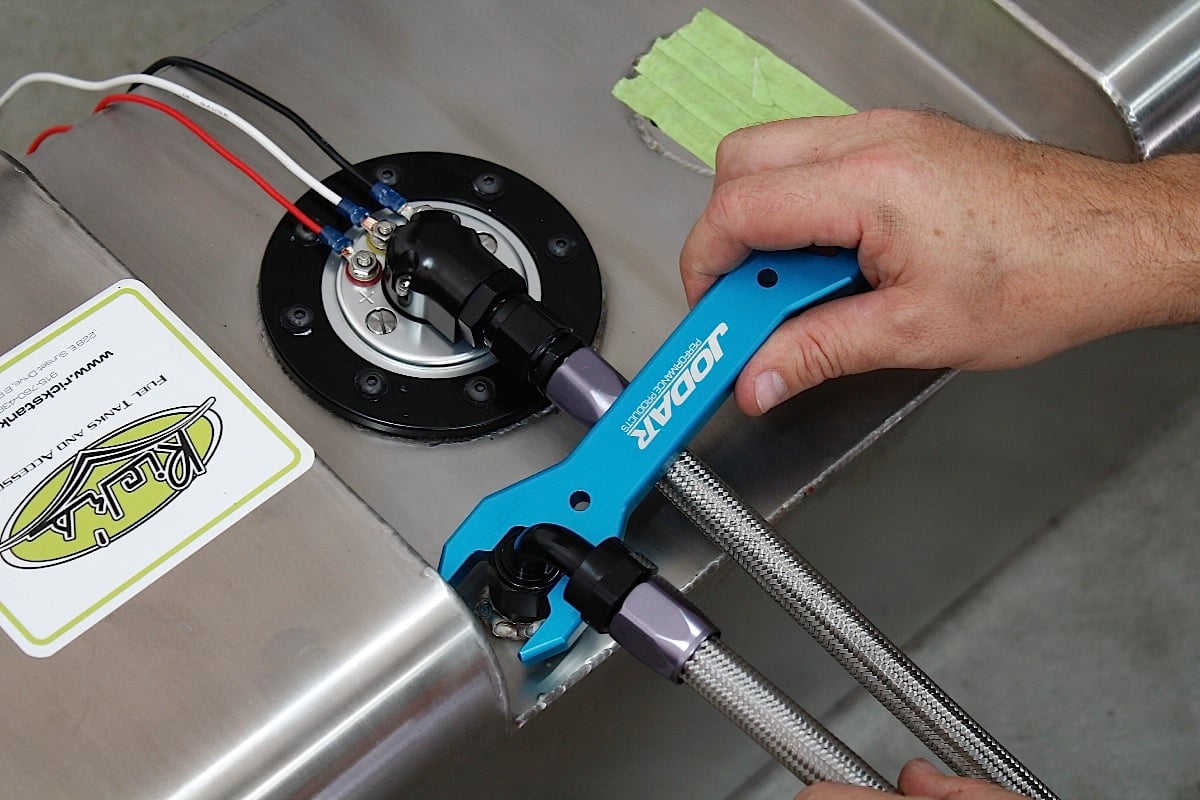
To plumb the individual components together, Russell Performance had everything we needed. A solid aluminum or stainless steel tube can be used in place of flexible braided stainless steel fuel hose, but tubing requires proper measuring and bending, which can be time consuming.
Raising the car and supporting it with jack stands allows you easier access to test fit fuel hoses and fittings.
The stainless steel braided hose offers more flexibility for this type of installation, and also offers an extra barrier of protection from the elements. It also makes the installation go much faster, and a lot easier than fabricating a new steel line.
We mounted the components where we wanted them, like the filter and the FPR, and planned out the system for the necessary anodized fittings for the fuel pump hat, the fuel filter, the FPR, and the throttle bodies. In some places a 90-degree fitting worked best, other places a straight or 45-degree fitting was a better fit. Placing one component in the wrong spot could mean difficulty in running and connecting fuel hoses, so it’s very important to make sure that any fitting used will allow the fuel hose to connect directly, without adding any unnecessary bends or flexing to the fuel hose.
Although the fuel hose is flexible, it should not be forced into a tight bend in order to connect the fitting to a component. It’s also important to make sure that there is room for the fuel hose to flex with the vehicle, or the engine, and that it isn’t taught. If there isn’t room for the fuel hose to flex, it could cause the hose to separate from the fitting or component and cause a fuel leak. Be generous, but not so much that the fuel hose is laying across a component, or that it’s hanging down where it can come in contact with hot or moving parts.
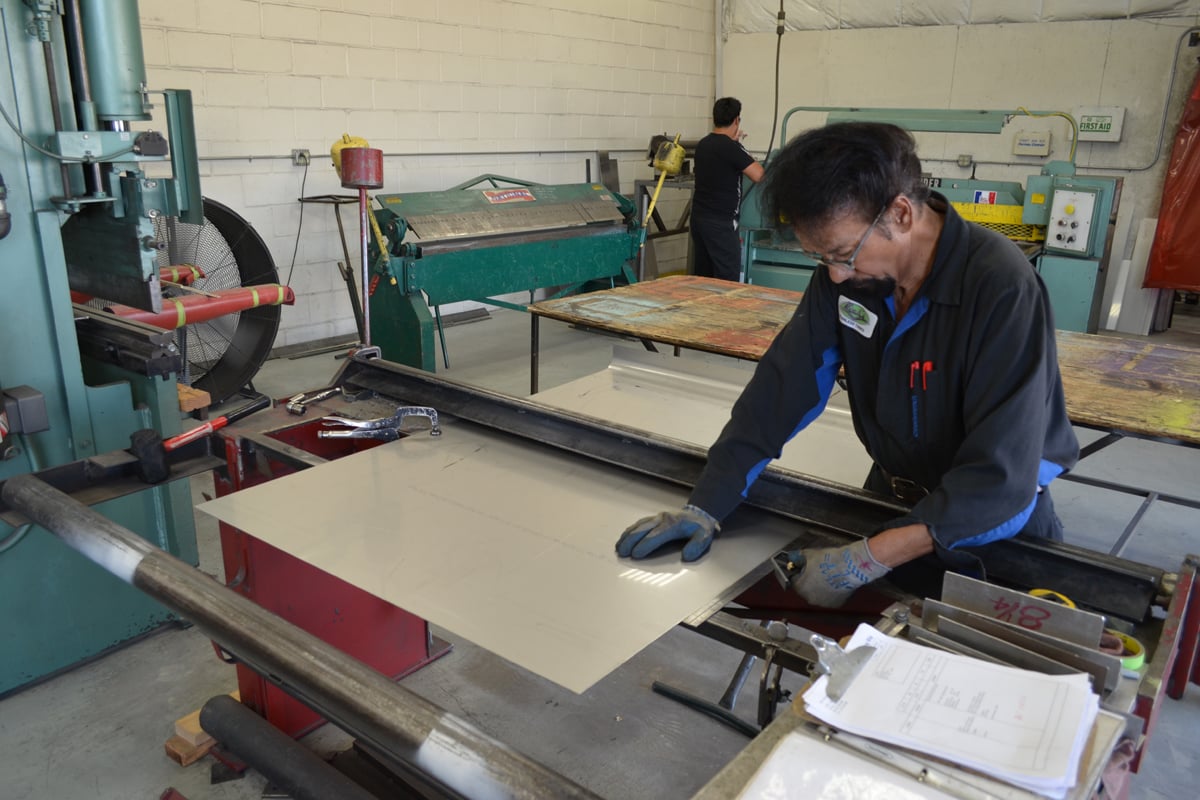
To make the tank at the top, manufacturing begins with sheets of stainless steel that are formed into shape and welded together to form a baffled tank.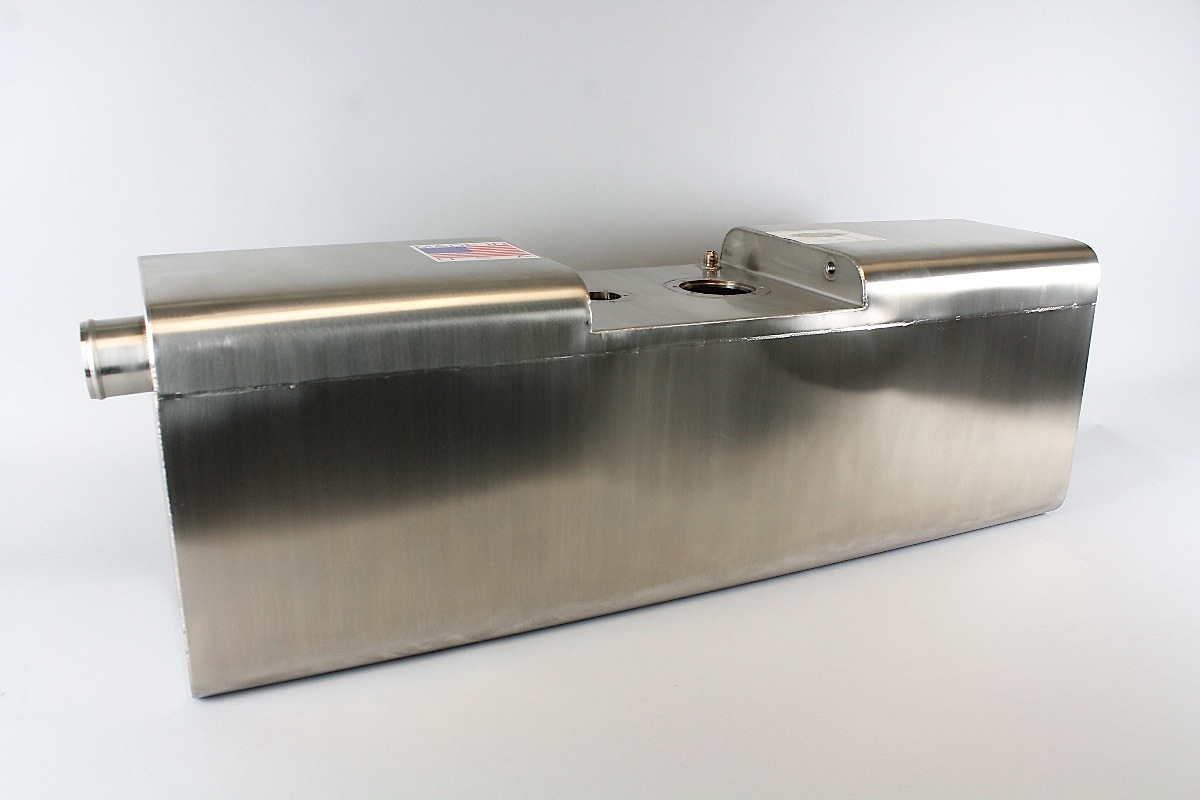

Installation In A Custom Fuel Tank
Unfortunately, factory fuel tanks aren’t baffled for the needs of an EFI system. With a carburetor, the fuel bowl will maintain enough fuel to keep the engine running even when fuel in the tank sloshes around during hard cornering or acceleration. But EFI requires constant, high fuel pressure and when fuel sloshes around too much the pump sucks air instead of fuel, affecting engine performance.
Try racing an autocross or road course when the pump stops pumping fuel and you can find yourself losing power in the turns. This can also affect hard launches in drag racing, where the fuel is pulled back away from the pickup tube. Even with an in-tank pump, the pump needs to be at least partially submerged at all time in order to pick up fuel.
The pump body is also serviceable, and can be swapped out for a different pump for racing applications.
Keeping the EFI system pressurized can be done a couple of ways, but with an in-tank electric fuel pump one of the better methods is to fabricate a custom fuel tank that is baffled to control fuel slosh. Factory original fuel tanks for classic cars are not baffled, nor do they have provisions for an in-tank pump.
Custom fabricators, like Rick’s Tanks, can build a vehicle-specific fuel tank for just about any classic car and truck. That means a properly baffled fuel tank that will bolt directly to your vehicle without modification.
Rick’s Tanks builds these tanks to order, and the baffles in the tanks are full height plates that are welded inside the tank. Small holes towards the bottom edge of the plates allow fuel to enter the baffled area. Because the holes are small, fuel that is moving between the tank the baffled area can’t flow fast enough to affect fuel pump operation.

Rick’s Tanks can custom make the flange for any pump that you plan to use.
As the tank gets filled, the fuel fills the baffled areas through these holes and maintains the fuel level. When hard launches or hard cornering happens, the fuel inside the baffled area is more stable, and keeps the fuel pump pick-up submerged. The fuel outside of the baffled area can move quite a bit but doesn’t affect the fuel pump operation.
Fuel slosh is nothing new, and even in a carburetor application the fuel bowl can slosh and cause the engine to stumble. But high pressure EFI systems require that pressure is constant, because unused fuel is typically returned to the fuel tank.
Rick’s Tanks starts with patterns that they make from a factory tank, and then they weld the pieces together to form the tank. The baffles are put into place based on the location of the pump, and the top is welded into place to close it up. They can also fabricate pumps to a customer’s measurements and specifications, including increased capacities, or smaller fuel cells to fit between rear frame rails.
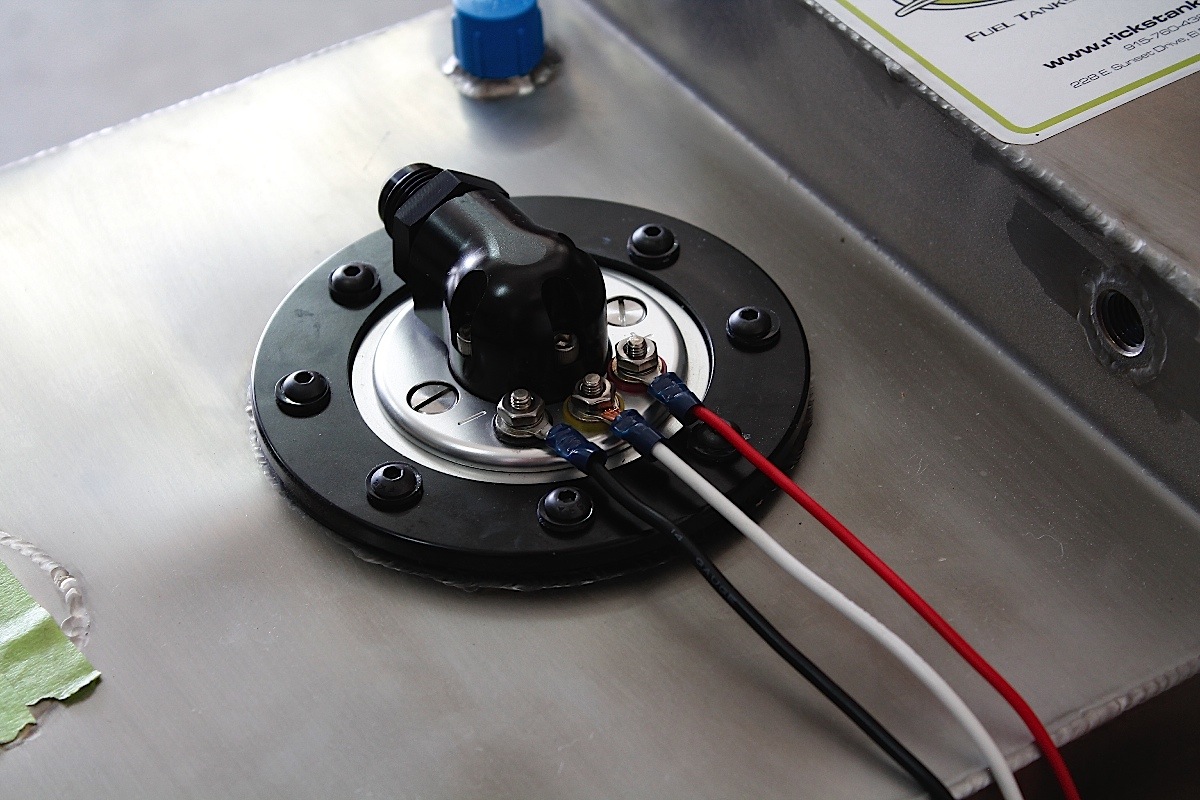
The fuel level sender is also included based on application, but if a customer chooses to use an existing one, it’s recommended that the level sender is shipped to Rick’s Tanks so they can make the proper flange for it. The fuel tank is also fitted with a threaded vent, and an AN-style return line fitting. For returnless systems, the return fitting can be plugged.
The thick flanges for the pump and the fuel level sender assure a tight, leak-proof seal.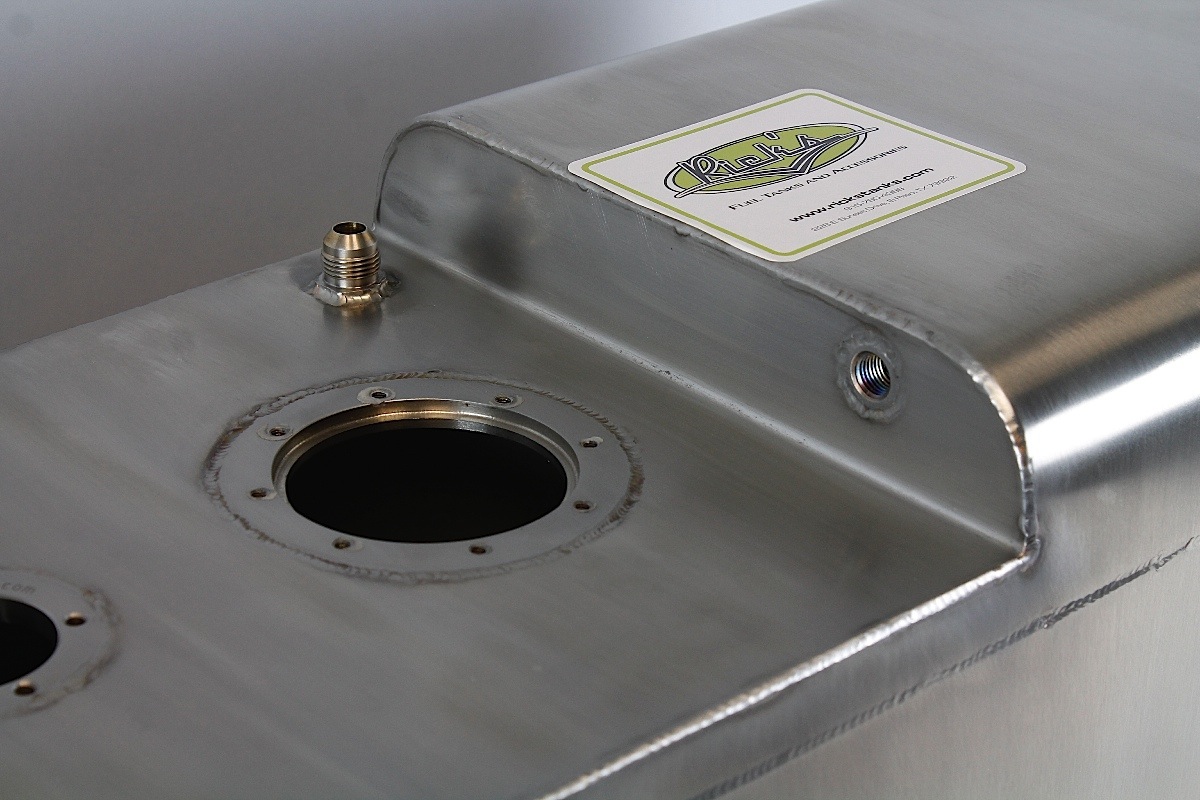
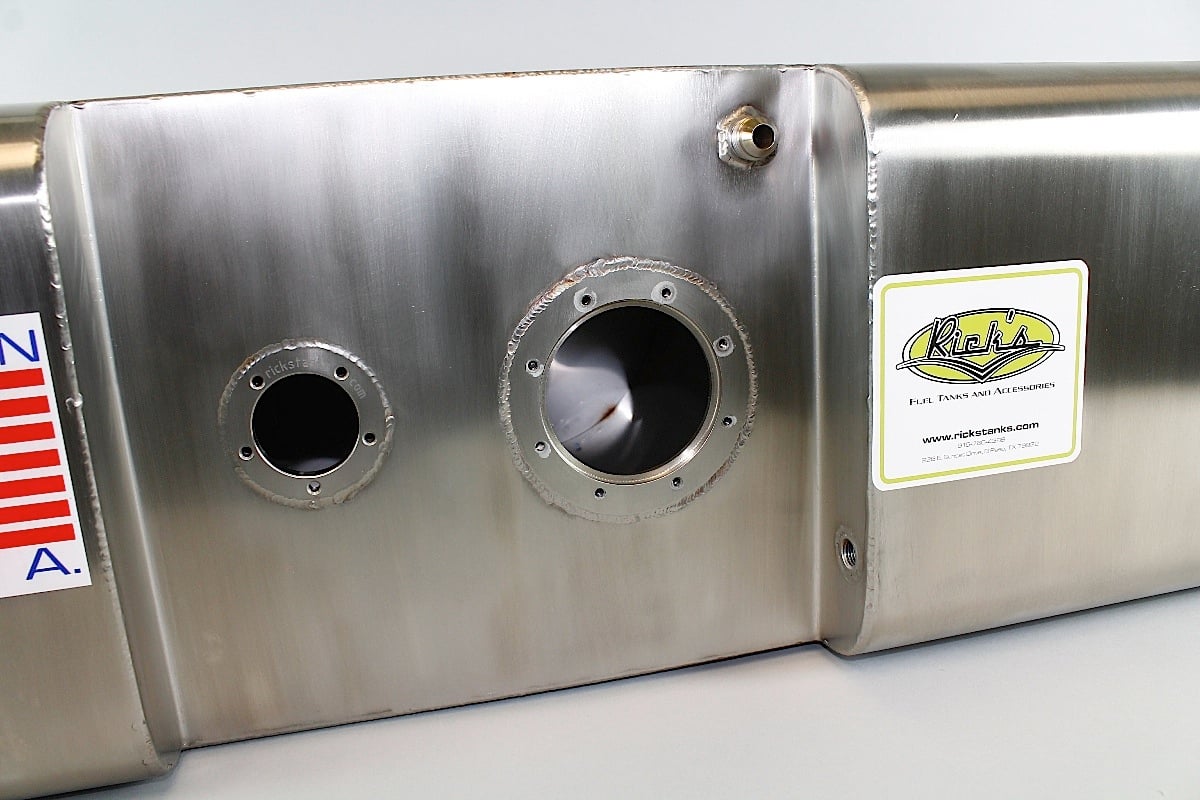

The tanks are TIG welded from 304 grade stainless steel, and designed for cars with either carburetors or retro-fit fuel injection systems. The pump and sender is included, unless you use a different pump like we did. We sent our Fuelab pump to Rick’s Tanks and provisions for this fuel pump were built into the tank. Otherwise a 51 psi fuel pump which flows at 41 gph is included with the tank, and it can support up to 450 horsepower. Rick’s Tanks can accommodate customer needs, and they are more than familiar with the most popular in-tank fuel pumps on the market, but sending your pump to them prior to construction will assure that everything will fit properly.
Mounting flanges for the pump and sending units are CNC machined from 3/8-inch thick 304 stainless steel stock. Replacement pumps are readily available from your local GM parts dealer. The tank features -6AN supply and return lines; electrical terminals on top of the fuel pump hanger allow for simple electrical connections to power the pump. Our Fuelab Prodigy pump requires a -8AN hose and fitting, and the tank was built to our requirements.
Although we did have a custom tank fabricated for this application, it should be noted that the Fuelab Power Module Flange System can be mounted inside a factory tank. It only requires use of a hole saw and standard drill bits, and the stock tank can be modified. Precautions do need to be taken, however, and you should never cut or grind on a fuel tank that hasn’t been thoroughly cleaned out and with all fuel removed. One method to insure the fuel is diluted is to fill the tank with water prior to cutting or drilling.

Final Connections, One Step Closer
We test fit our hoses and electrical wires on the pump mounted to the tank and raised the tank into position to make sure that none of the electrical wires or hoses would get crimped between the tank and the sheet metal on the car. The fuel hoses were then routed under the car and tied up to the frame rail, away from heat sources or moving parts, being sure to keep them higher than the frame rail when possible for further protection.
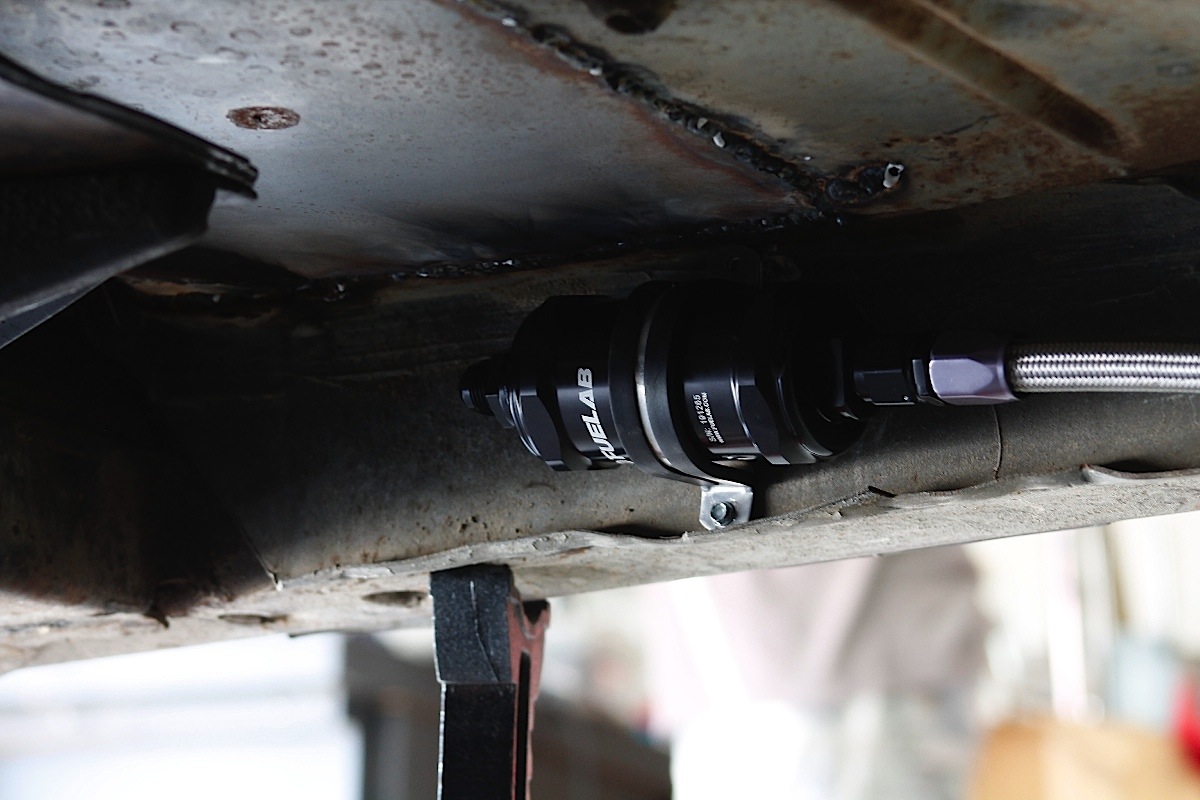
The in-line filter is mounted to the frame rail, and secured with the included strap.
The fuel filter was mounted low on the frame, tucked up inside for protection, and the fuel lines continued up to the Fuelabs electronic FPR mounted to the fender apron. Instructions for routing fuel lines for a single or dual throttle body are included with the FPR, and depending on the system the connections can vary. It’s recommended to follow the instructions from the manufacturer of the FPR, don’t assume that they’re all the same.
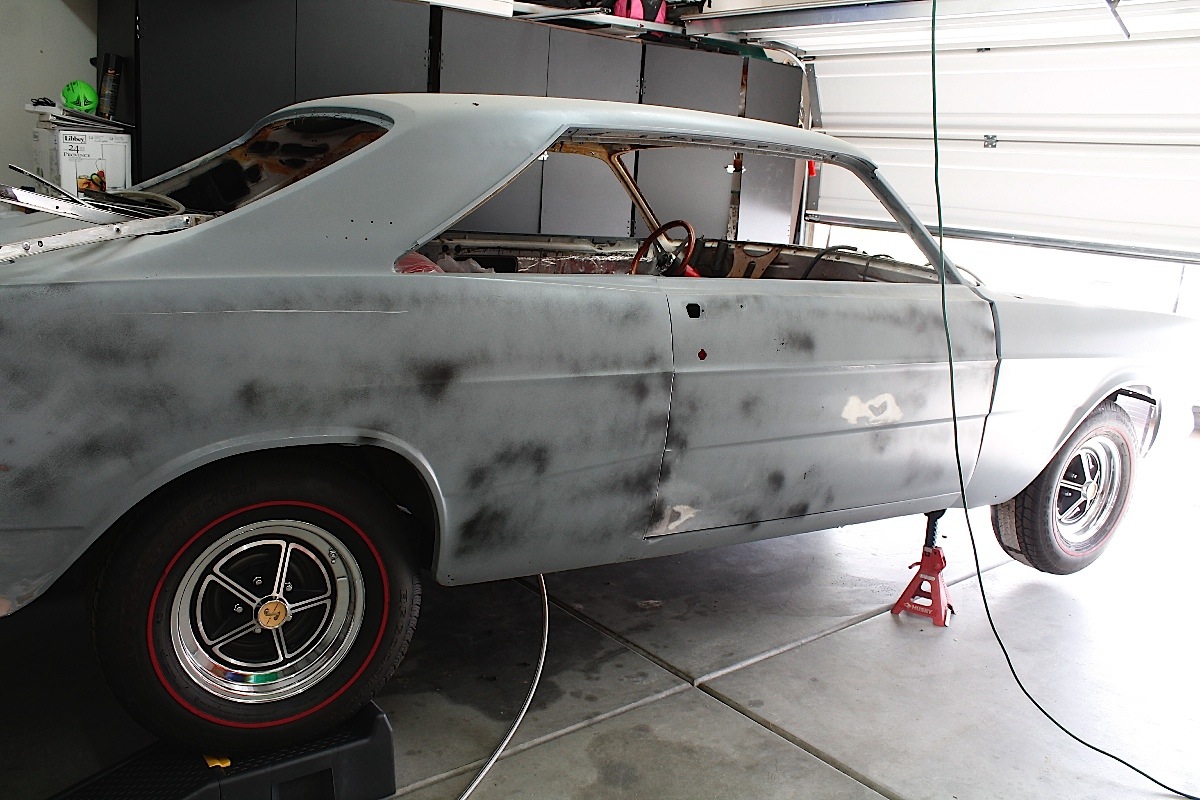
We finished plumbing the fuel system and mounting all components on our Galaxy, but it will still be a little while before we can drive the car because, as project cars go, it’s not quite ready for the road. It will still need an exhaust system installed, and the electrical wiring needs to be completed, and the interior is waiting to be installed. Since the car also needs a coat of paint, and some of the mechanicals installed, we wanted to make sure that we could mount everything into place before we pull it all back apart and send it out for paint.
Until that time, the Galaxy will continue to be a project car. But we know that when it comes time to turn the key and fire it up, our Fuelab Prodigy fuel system will provide the Galaxie with all the fuel it needs. Check out the Fuelab website for all of your fuel system needs, including pumps, filters and regulators – regardless of whether you plan to cruise at 70 mph – or 200 mph.


